Creating a 3PAR document bundle

This guest post by Armin Kerl (Cali) shows three different methods you can use to create a document bundle for your 3PAR.  Lets take a look at the first method:

Service Processor 4.x

Here is a quick tip for 3PAR users that have a Service Processor 4.x. version.

Creating document bundle using the 3PAR service processot

1 Login into the Service Processor Web Site

2 Now Select: Files > Files > Your serial number > Config > Download the most recent File

3 Rename the File to My3PARDoc.html

Service Processor 5.x

1 Login into the Service Processor Web Site

2 Now Select: General > Files and set the filter Type = Collection (CONFIG)
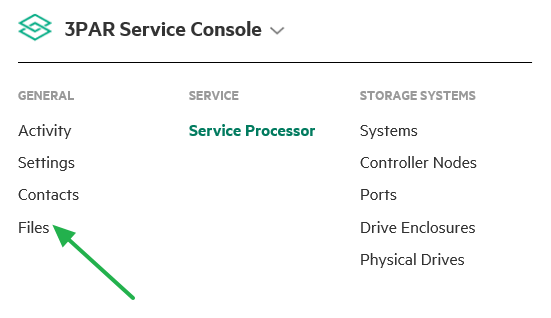
3 Select the latest file and choose Actions > Download

3 Rename the File to My3PARDoc.html

That is all, you just got a full documentation set for your 3PAR.

StoreFront Remote

If you enable 3PAR for call home, there are additional ways:

First is HPE InfoSight

1 Login with your HPE Passport Account.

2 If you have not mapped the 3PAR with your Account, do this by “Register Systems”.Once done wait for 1-2 Days. Then InfoSight > Infrastructure > 3PAR StoreServ > Systems should show the 3PAR Systems.

Register 3PAR with InfoSight

3 Select the 3PAR and on the right Side Actions > “Create PDF”

Creating document bundle using StoreFront remote

StoreVista

The next method uses StoreVista

Here you can generate some reports that the system mailed to you on one-time or regular basis. Be sure to Read the Instructions in the Download Section

StoreVista document bundle method


hms-evolve_365_secure_score1

Securing Office 365

This weeks guest post is brought to you by Seb Masterton-Smith from HMS-evolve, a Microsoft Cloud Solution Provider.

In this world of uncertainty, insecurity and downright misinformation, how do you know if your cloud service is secure and maintain its integrity?

One provider has created a tool which gives you a score of how secure your tenancy is based on a series of security best practices. Not only is Office 365 one of the most popular cloud services for collaboration and productivity, but it’s also cramming in a host of secure features that would please most high security sites. It’s called Office 365 Secure Score and it gives visibility into just how secure your implementation is and presents you with a rating, much like a credit rating score.

Simple? Scary?

Sounds simple, and it really is!

Office 365 Admins can simply go to https://securescore.office.com to see how they are doing, and can share this information with other users in the business.

Once you are in, the first thing you’ll notice on the dashboard is the score itself, a huge number in the middle of the screen, and if it’s the first time it’ll likely be lower than you might think. Your first instinct will be to panic, and perhaps question everything you know about your Infrastructure, fearing that some teenager in his parents’ house is hacking into your data right now.

hms-evolve_365_secure_score1

Stop, take a deep breath, count to 10 or go for a walk, whatever you need to calm down, it’s not as bad as it seems. Once you’ve calmed down, made a coffee and got back to your screen, here’s how you can take advantage of this information and improve that terrible score.

Take action!

Underneath the scary score you’ll find a list of actions which can help improve it. It’s worth going through each one and understanding what each one means, there’s not enough time to go through them all here, but they are broadly split into 3 categories (account, device and data. Some tasks are an immediate change and forget (such as enabling Multi-Factor Authentication), others are suggested to be reviewed periodically (reviewing sign-ins after multiple failures report weekly).

hms-evolve_365_secure_score2

Either way, there are a lot of really sound security features that will help secure your business, especially with the new European General Data Protection Regulations coming in May 2018, which impact all businesses that interact with European citizens.

hms-evolve_365_secure_score3

Great, so this will tell me if I am more likely to get breached?

Unfortunately, it won’t. There is no way to properly measure whether your Infrastructure is liable to get breached or not, because that depends on many more factors than simply the security of the Infrastructure. Someone that is determined won’t be stopped by anything.

What it can do is go some way to mitigate the risk of your accounts, devices or data getting breached.

So my advice as a minimum is to go through the score and change options that you know about, and for the other options you can ask consultancy’s such as HMS-evolve to offer a free consultation on the rest.

3PAR Simulator Setup

Intro

This post provides a full video and text guide to downloading and setting up the 3PAR simulator. The 3PAR Simulator is made up of a group of VM’s that emulate a physical 3PAR, this could be useful for testing, training etc. Once you have finished with this guide you can interact with your simulator using all the usual tools you would in the real world, the 3PAR Managements console, SSMC, CLI and API. You can configure the VM that represents the cages to have up to 4 cages and these contain a mixture of SSD, SAS and NL.

It can emulate the following features

  • Storage Provisioning including Thin-Provisioning
  • Exporting Virtual Volumes
  • Adaptive Optimization (AO)
  • Dynamic Optimization (DO)
  • Local Replication (Snapshot)
  • Remote replication (requires the setup of 2 3PAR simulators)
  • Up to 48 HDDs, 4 cage configuration
  • Cage types – DCN2, DCS7, DCS8
  • Disk types – FC, SSD, NL
  • 3PAR Management Console support
  • CLI and Remote CLI support
  • CIM-API (SMI-S) and WS-API support

Requirements

You will require a VMware environment running vSphere 5.5 or Workstation 11 or above. The process will involve creating three VM’s, two of the VM’s will represent the two nodes of a 3PAR whilst the third VM will represent the drive cages. The resource requirements for each of the three VMs are identical and fairly light:

  • One CPU
  • Three vNIC
  • 2GB RAM
  • 50GB disk space

Steps to install

To give you a feel for the process, the high level steps to install the 3PAR Simulator are:

1 Install the two cluster node VMs

2 Install the enclosure node VM

3 Create a private network between VMs

4 Complete initial simulator config

Video Guide

Enough chat! Lets get this 3PAR simulator installed, this video gives a step by step guide to get up and running as quickly as possible. You’ll find everything you need in the video including the 3PAR simulator passwords.

In part 2 we complete the simulator setup. Covering getting the simulator configured and operational tasks such as how to start it up and shut it down.