Some of the ground work you have to do when planning a 3PAR upgrade can be quite time consuming, so I have been looking at ways to automate the process and make it quicker. Today’s post focuses on using scripts to speed things up. This will form part of a series on upgrades so don’t forget to connect with me on LinkedIn and Twitter to ensure you don’t miss any posts.
Check multipath policy
As a pre-upgrade step you will need to check that all Windows 2008 hosts using the MS MPIO driver have their multipath policy set to round robin. I used a script to make this step quicker.
The script uses Psexec to connect to a list of hosts and run mpclaim –s –d from the command line to check the current multipath policy. You can download Psexec from here .
The steps to check the host multipathing on multiple hosts via a single script are as follows:
1 Choose the server you want to run the script from and create a folder on it called C:scripts. Copy psexec to this folder
2 In C:scripts create a file called 3par_servers.txt Populate this with a list of the servers you wish to check for multipath configuration
3 Also in C:scripts create a batch file called mpclaim.bat and enter the following command line into it:
mpclaim -s -d
4 Finally, open a command line on the machine from which you wish to run the script, change directory to C:scripts and then enter
psexec -c -f @C:scripts3par_servers.txt C:scriptsmpclaim.bat
5 You should then see the window populate with the information you require. An example of the output is below:
PsExec v1.71 - Execute processes remotely
Copyright (C) 2001-2006 Mark Russinovich
Sysinternals - www.sysinternals.com
\Server1
C:Windowssystem32>mpclaim -s -d
For more information about a particular disk, use 'mpclaim -s -d #' where # is the MPIO disk number.
MPIO Disk    System Disk  LB Policy    DSM Name
-------------------------------------------------------------------------------
MPIO Disk4   Disk 5       RR           Microsoft DSM
MPIO Disk3   Disk 4       RR           Microsoft DSM
MPIO Disk2   Disk 3       RR           Microsoft DSM
MPIO Disk1   Disk 2       RR           Microsoft DSM
MPIO Disk0   Disk 1       RR           Microsoft DSM
Check LB policy appears as RR for all volumes.
Compatibility Check
Before you upgrade your 3PAR system you need to check the compatibility of all the components in the SAN, this can be time consuming particularly in a large environment. One component that can be particularly lengthy is gathering information on all the attached hosts. In order to make gathering the host information as easy as possible in conjunction with my colleague Rafal Kozaczek we have taken a PowerShell script (SystemInfo_(Excel).ps1) written by Amol Patil and modified it so that all the host information required to check host compatibility is gathered automatically for Windows servers.
I have included the modified version of the script at the end of this post. As ever you are welcome to use the script, but please check it is suitable for use in your environment and you do so entirely at your own risk.
You will need to run the script from a workstation with PowerShell and Excel installed.
1 Copy the PowerShell script found at the bottom of this post into Notepad and then save as 3PAR_Hosts.ps1 to the location C:scripts on the machine you wish to run the script from
2 Open PowerShell as an administrator and change directory to c:scripts
cd c:scripts
3 Choose to run the script you just saved
3PAR_Hosts.ps1
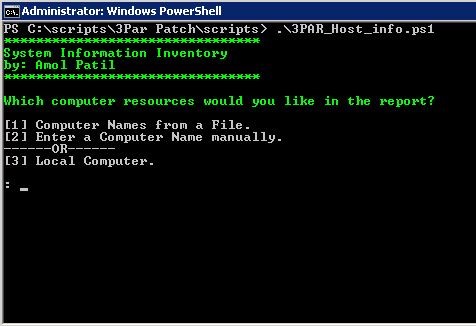
4 Select option 1 to run the script against a list of hosts in a text file. When prompted enter the host list you created earlier 3par_servers.txt
The resulting spreadsheet will deliver all the information you need to complete the host checks. Columns A – I are the ones you will need, the other info was already pulled by the original script so I just left it in there.

The PowerShell code is in full below. You are free to use it but you do so entirely at your own risk, please also take the time to read through it before you run it so you fully understand what it does.
[code language="powershell"]
 #@=============================================
 #@ FileName: SystemInfo_(Excel).ps1
 #@=============================================
 #@ Script Name: SystemInfo_(Excel)
 #@ Created: [DATE_DMY] 20/03/2013
 #@ Author: Amol Patil
 #@ Email: [email protected]
 #@ Edited by 3ParDude (Richard Arnold) / Rafal Kozaczek to gather host information for 3PAR upgrade. http://3ParDude.com
 #@ Web:
 #@ Requirements:
 #@ OS:
 #@ Keywords:
 #@ Version History:
 #@=============================================
 #@ Purpose:
 #@ To collect System Information local/remote
 #@
 #@=============================================

#@================Code Start===================

# ==============================================================================================
 # Function SysInfo - collects information using WMI and places results in Excel Sheet
 # ==============================================================================================
 Function SysInfo {

foreach ($StrComputer in $colComputers){

$GenItems1 = gwmi Win32_ComputerSystem -Comp $StrComputer
 $GenItems2 = gwmi Win32_OperatingSystem -Comp $StrComputer
 $SysItems3 = gwmi Win32_WmiSetting -Comp $StrComputer
 $MemItems1 = gwmi Win32_PhysicalMemory -Comp $StrComputer
 $MemItems2 = gwmi -class MSFC_FCAdapterHBAAttributes -Comp $StrComputer -Namespace "rootWMI"
 $MemItems3 = Invoke-Command -ComputerName $StrComputer -ScriptBlock {(Get-Command c:windowssystem32driversmpio.sys).FileVersionInfo}
 $NetItems = gwmi Win32_NetworkAdapterConfiguration -Comp $StrComputer  | where{$_.IPEnabled -eq "True" -and $_.DNSHostName -ne $NULL}

# Populate General Sheet(1) with information

foreach ($objItem in $GenItems1){

#$Sheet1.Cells.Item($intRow, 1) = $StrComputer
 $Sheet1.Cells.Item($intRow, 1) = $objItem.Name
 $Sheet1.Cells.Item($intRow, 15) = $objItem.Domain
 $Sheet1.Cells.Item($intRow, 2) = $objItem.Manufacturer
 $Sheet1.Cells.Item($intRow, 3) = $objItem.Model
 $Sheet1.Cells.Item($intRow, 16) = $objItem.SystemType
 $Sheet1.Cells.Item($intRow, 10) = $objItem.TotalPhysicalMemory / 1024 / 1024

}

foreach ($objItem in $GenItems2){

$Sheet1.Cells.Item($intRow, 4) = $objItem.Caption
 $Sheet1.Cells.Item($intRow, 11) = $objItem.BuildNumber
 $Sheet1.Cells.Item($intRow, 5) = $objItem.CSDVersion
 $Sheet1.Cells.Item($intRow, 9) = $objItem.Version
 $Sheet1.Cells.Item($intRow, 12) = $objItem.OSArchitecture

}
 foreach ($objItem in $NetItems){

$Sheet1.Cells.Item($intRowNet, 13) = $objItem.IPAddress

}

foreach ($objItem in $MemItems2){

$Sheet1.Cells.Item($intRow, 6) = $objItem.Model
 $Sheet1.Cells.Item($intRow, 7) = $objItem.DriverVersion
 $Sheet1.Cells.Item($intRow, 8) = $objItem.FirmwareVersion

}

foreach ($objItem in $MemItems3){

$Sheet1.Cells.Item($intRow, 14) = $objItem.ProductVersion

}

$intRow = $intRow + 1
 $intRowNet = $intRowNet + 1

}

}

#@=============================================

# ========================================================================

# Function Name 'HostList' - Enumerates Computer Names in a text file

# Create a text file and enter the names of each computer. One computer

# name per line. Supply the path to the text file when prompted.

# ========================================================================

Function HostList {
 $strText = Read-Host "Enter the path for the text file"
 $colComputers = Get-Content $strText
 }

# ========================================================================

# Function Name 'Host' - Enumerates Computer from user input

# ========================================================================

Function Host {

$colComputers = Read-Host "Enter Computer Name or IP"

}
 # ========================================================================

# Function Name 'LocalHost' - Enumerates Computer from user input

# ========================================================================

Function LocalHost {

$colComputers = $env:computername

}

#@=================================================================================================================================
 #Gather info from user input.

Write-Host "********************************"               -ForegroundColor Green
 Write-Host "System Information Inventory"                   -ForegroundColor Green
 Write-Host "by: Amol Patil "                                -ForegroundColor Green
 Write-Host "********************************"               -ForegroundColor Green
 Write-Host " "

Write-Host "Which computer resources would you like in the report?"   -ForegroundColor Green

$strResponse = Read-Host "
 [1] Computer Names from a File.
 [2] Enter a Computer Name manually.
 ------OR------
 [3] Local Computer.

"

If($strResponse -eq "1"){. HostList}
 elseif($strResponse -eq "2"){. Host}
 elseif($strResponse -eq "3"){. LocalHost}
 else{Write-Host "You did not supply a correct response, `

Please run script again." -foregroundColor Red}

Write-Progress -Activity "Getting Inventory" -status "Running..." -id 1
 #@=================================================================================================================================

#New Excel Application

$Excel = New-Object -Com Excel.Application

$Excel.visible = $True

# Create 2 worksheets

$Excel = $Excel.Workbooks.Add()

# Assign each worksheet to a variable and

# name the worksheet.

$Sheet1 = $Excel.Worksheets.Item(1)

$Sheet2 = $Excel.WorkSheets.Item(2)

$Sheet1.Name = "SysInfo"

$Sheet2.Name = "Software"

#Create Heading for General Sheet

$Sheet1.Cells.Item(1,1) = "Host Name"
 $Sheet1.Cells.Item(1,2) = "Manufacturer"
 $Sheet1.Cells.Item(1,3) = "Server Model"
 $Sheet1.Cells.Item(1,4) = "Operating_System"
 $Sheet1.Cells.Item(1,5) = "ServicePack"
 $Sheet1.Cells.Item(1,6) = "HBA-Model"
 $Sheet1.Cells.Item(1,7) = "HBA-DriverVersion"
 $Sheet1.Cells.Item(1,8) = "HBA-FirmwareVersion"
 $Sheet1.Cells.Item(1,9) = "MS MPIO Version"
 $Sheet1.Cells.Item(1,10) = "Memory"
 $Sheet1.Cells.Item(1,11) = "BuildNumber"
 $Sheet1.Cells.Item(1,12) = "OSArchitecture"
 $Sheet1.Cells.Item(1,13) = "IPAddress"
 $Sheet1.Cells.Item(1,14) = "ProductVersion"
 $Sheet1.Cells.Item(1,15) = "Domain"
 $Sheet1.Cells.Item(1,16) = "SystemType"

$colSheets = ($Sheet1, $Sheet2)

foreach ($colorItem in $colSheets){

$intRow = 2

$intRowDisk = 2

$intRowSoft = 2

$intRowNet = 2

$WorkBook = $colorItem.UsedRange

$WorkBook.Interior.ColorIndex = 40

$WorkBook.Font.ColorIndex = 11

$WorkBook.Font.Bold = $True

}

If($credResponse -eq "y"){SysInfoCrd}

Else{SysInfo}

#Auto Fit all sheets in the Workbook

foreach ($colorItem in $colSheets){

$WorkBook = $colorItem.UsedRange

$WorkBook.EntireColumn.AutoFit()

#clear

}

Write-Host "@*******************************@" -ForegroundColor Green

Write-Host "The Report has been completed."  -ForeGroundColor Green

Write-Host "@*******************************@" -ForegroundColor Green

#@================Code End=====================
 [/code]

If you have found a way to speed up the process that you use, please let us all know in the comments.