Simplivity quick guide

Now that the dust has started to settle on the Simplivity acquisition news I wanted to do a cheats guide to get readers up and running with who Simplivity are, what the tech is all about and some thoughts on what we can expect in the future.

Simplivity

simplivity-highres

Simplivity was founded in 2009 and spent more than 3 years in stealth as they wanted to bring a unique product to market.  As we will see in the tech section their product covers the standard definition of hyper-converged compute, storage and hypervisor plus some additional features.  The company based in Massachusetts has been through 7 rounds of funding totalling $276 million.  The company was acquired by Hewlett Packard Enterprise on January 17 for $650 million, delivering investors a 2.4 times return on investment. This would appear to be a bargain given the $1 billion valuation attributed to the company during its last round of funding and well below the initial rumours of $4 billion.

Market Position

Whilst traditional storage revenues have been declining hyper-converged system growth has been booming.  Gartner were projecting 79% growth in the HCI sector in 2016 with the market expected to reach a $5 billion valuation by 2019.

For those new to this concept hyper-converged brings compute, storage and hypervisor into a single box. This datacentre in a box idea brings benefits such as less floor space in the DC, single point of management for infrastructure and ease of deployment.  Generally these hyper converged systems can be thought of as building blocks, so as you need more compute or storage you just add more of your chosen hyper-converged nodes to expand the capacity of your infrastructure.


Tech

So far we know that Simplivity is a hyper-converged “data centre in a box” product. The first thing to recognise is that Simplivity goes beyond the standard definition of hyper-converged a shown in this graphic from Simplivity.

hyper-converged

The following should give you a good feel for the product:

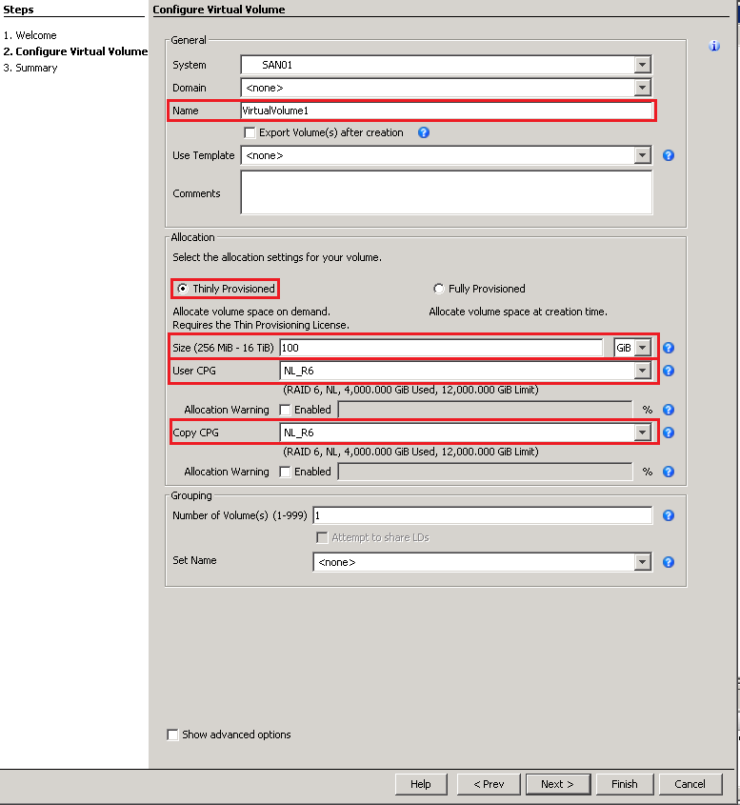
  • Physically each node of a Simplivity system is a 2U form factor, today called an OmniCube. This forms the building block of a Simplivity system.
  • The KVM, Hyper-V and VMware hypervisors are supported.
  • Each node contains an OmniStack Accelerator Card. All data is written to the DRAM on this card where the write is acknowledged, this is like caching on a SAN.
  • Data is compressed and deduped by the OmniStack Accelerator Card in line. This is very similar to the idea of using an ASIC in the 3PAR, by using an additional piece of hardware it is possible to offload all this work from the CPU. This is especially important in hyper-converged where the same CPU will also be powering your VM’s.
  • A collection of local Simplivity nodes is called a Simplivity Data Centre
  • The storage across all nodes in Simplivity Data Centre is pooled together into a single logical file system. Dedupe and compression is across the Simplivity data centre. Simplivity claim a median data efficiency of 40:1.
  • Backup is possible using Simplivity natively without third party tools and is policy driven.
  • Simplivity systems across physical data centres can be grouped together in a federation, this enables a single point of management. It is possible to move VMs and backup across a federation.
  • All data is deduped and compressed inline at ingestion. This includes backup and replication data, so when the data arrives at the target system it will check if data is unique before writing it to disk.
  • You may hear the terminology data virtualization platform – this is essentially the layer that abstracts the VM from the underlying hardware. Locally this means the disks from all nodes are abstracted to appear as a single pool of storage and within a Federation this allows the free movement of VM’s between Simplivity Data Centres.
  • Systems can all be managed centrally within the vSphere web client .

simplivity-web-client

Future

Its clear HPE will want to bundle the Simplivity software with its ProLiant DL380 servers, and the official press release stated this will happen within 90 days of closing the deal. They will continue to offer Simplivity with an expanded list of the Proliant catalogue from there.  HPE have stated they will continue to offer the HC 380 and HC250. Simplivity partners with 6 manufactures including Dell and Lenovo.  If HPE continue to honour this deal and take an additional revenue stream or focus entirely on organic growth will remain to be seen

It is interesting that the Simplivity dedupe and compression magic is performed at a hardware level with the OmniStack Accelerator Card similar to the 3PAR approach with the ASIC.  I wonder if we see this get bolted onto the 3PAR the future to enhance the dedupe capability and deliver compression.

Don’t miss any more news or tips by following by e-mail or Twitter.


The dashboard homescreen of the storeserv management console

Newbies Guide to the 3PAR SSMC

Today I wanted to do a beginners guide to 3PAR SSMC to help learn how best to use it. So far in this StoreServ Management Console 101 series we have covered what’s new in the latest version, how to install SSMC and how to add systems to SSMC.  Today I want to run through the basics of the new interface so you can get up and running fast.

SSMC looks significantly different to the 3PAR Management Console, so the purpose of today’s post is to provide some familiarisation for those moving across to SSMC or starting out with 3PAR for the first time.

Logging onto SSMC

SSMC is a web based console to access it you just need to enter the hostname of your SSMC server and specify the port 8443 in your web browser, for example https://ssmcserver:8443/. Authentication is as before either with local accounts defined on the 3PAR or via LDAP. If you have ben using the IMC previously, the accounts you have used to login to that will continue to work.

The Dashboard

Once you login you are presented with the Dashboard, this is your home page if you like and provides an overview of all your connected systems on areas like health, capacity and performance.

The dashboard homescreen of the storeserv management console

If you want to drill down on any item you can do so by clicking on the donut or by selecting the title (storage systems in the screenshot below) above the donut.

Drilling down on a system panel

Most of the donuts are self-explanatory. The performance donut relates to Threshold Alerts, which are a new feature that allows you to set alerts up for most components of the system. An example of a Threshold Alert  would be when host ports exceed 50% utilisation raise an alarm. When one of these alerts is triggered it will be reflected in the performance donut.

There is no home button for the dashboard view you must go through the Main Menu. As I find myself regularly going here I have created a shortcut to the Dashboard and added it to the links toolbar of my browser. Should you wish to do the same the shortcut is https://YourSSMCServer:8443/#/dashboard

Main Menu

To move around between screens you have what was called the Mega Menu in older version, but now has been demoted to be named the Main Menu. You click on the drop down arrow at the top left to pull down the Main Menu. By default the Main Menu will appear in a minimised form only showing the most common tasks.

To see all the available options you need to click show all and you will then be presented with the view below.

3PAR Console main menu maximised

The available screens are grouped into categories. The block persona category for example contains the screens: hosts, virtual volumes,CPGs this would have been called the provisioning area in the 3PAR Management Console.

Search

Next to the Main Menu at the top of the screen you have the Search function. The Search function allows you to search just on the screen you are in to narrow a list of VV’s for example or searches the entire system.  Below shows an example of where a Search has been performed everywhere for the term WIN and both hosts and virtual volumes have been found.

search 2

The other way Search can be used it by typing create, which again is context sensitive so the results will depend on which screen you are in.  Below I have typed create in the virtual volumes screen.

create virtual volumes via search command

Below I have again typed in create but this time checked the everything box and I can then see all the create options not just those relevant to virtual volumes.

create used but not tied to current scvreen

Getting Help

The online help is pretty good and can be accessed by clicking the question mark on the top right of the console. There are 2 animated help guides that walk you through basic navigation and provisioning listed under screencasts in help. If you are on any screen and not sure what to do you can again click on the question mark and select help on this page.

I also wanted to highlight where you can find documentation online:

HPE 3PAR StoreServ Management Console 3.1 Administrator Guide

HPE Management Console 3.1 Release Notes

HPE 3PAR StoreServ Management Console User Guide

Working with a screen

Once you have chosen a screen to work with it will be split into two halves, on the left is your list pane and on the right the detail pane. The screenshot below is the Virtual Volumes screen. The description of the panes is pretty self-descriptive you see your list of items on the left and then further detail for each on the right.

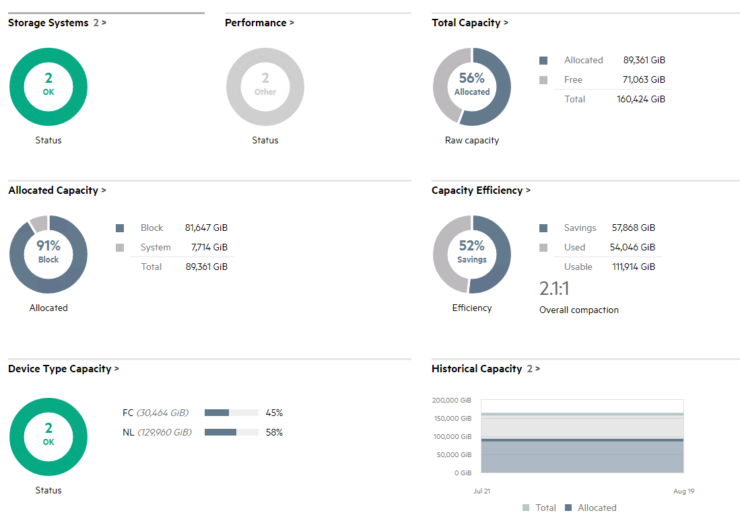
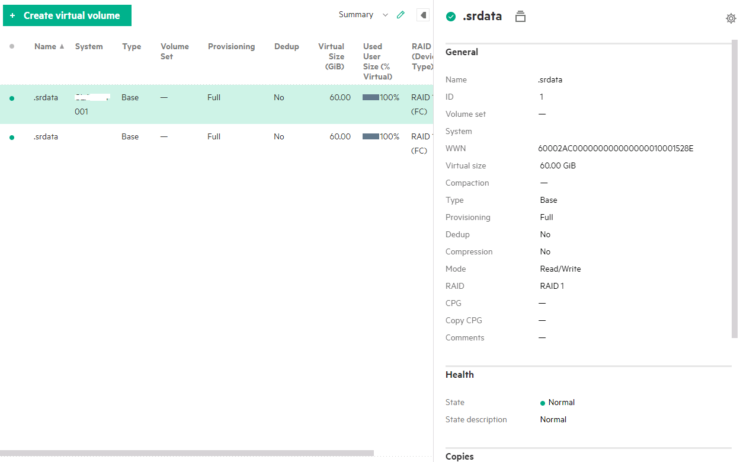
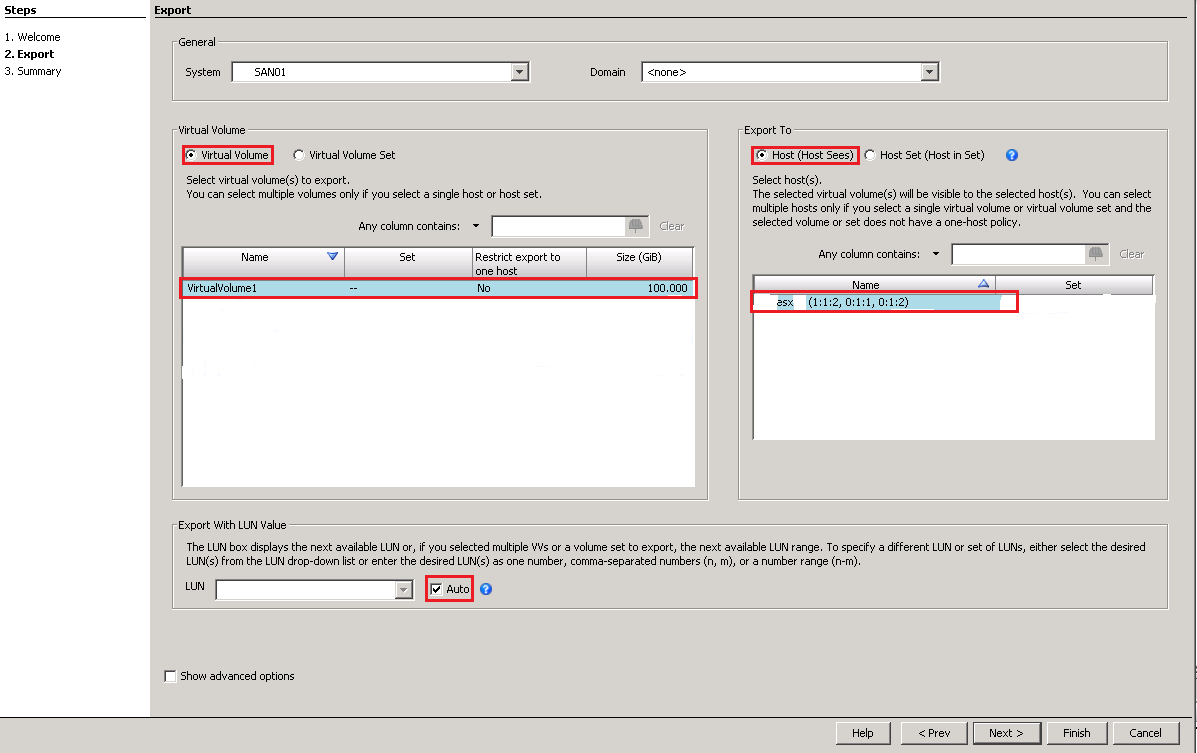
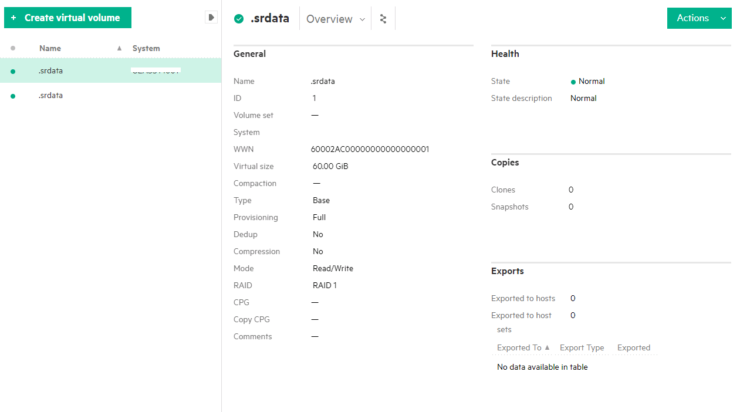
Rather than have to click through each item individually to see more detail you can click the expand arrow in the list pane (I have highlighted in the above screenshot), this will give you a view like below.

ssmc virtual volume screen

You can filter your list of items either through the search function or through using the drop down filters at the top of the page, in the below screenshot the provisioning filter is displayed.

Filter views available in the virtual volume view

For each detail pane you can choose from several different views, by clicking on the views drop down button. You can think of the views almost like the tabs in the 3PAR Management Console, you have chosen the item you want to work with and are now looking into different elements of it.

views available for vv

To make changes to any item you select the actions menu, this is located in the top right of the details pane. The action menu is context sensitive to which screen you are in.  Below is an example of the available actions from the Virtual Volume screen

Map View

The Map View is something that helps pull it all together by mapping the relationship between components. This is an example of Map View with AO. I think some components suit Map View better than others and AO is an example where it does work and it is useful to see the relationship between objects.

4 AO Map view

To get more of a feel for the console check out these videos:

Calvin Zito – SSMC Overview

HP SSMC Short Take

Related SSMC Posts

Installing 3PAR SSMC

The SSMC Administrator Console

Configuring Threshold Alerts

SSMC 3.1 – What’s new?

3Par 101 – Part 3 – Virtual Volumes and Vlun’s

In this 3PAR 101 series so far we have looked at 3PAR fundamentals and the systems unique approach to RAID, in Part 2 we looked into Common Provisioning Groups (CPGs)    Now we get onto the stage where we can provision some storage to hosts by using virtual volumes and vluns!

Virtual volumes (VV’s) are HPE’s terminology for what would most commonly be called a LUN, a LUN which has been presented or exported to a host is called a VLUN. Virtual volumes draw their space from CPG’s and come in two varieties Fully Provisioned Virtual Volumes (FPVV) and Thin Provisioned VV (TPVV). A FPVV uses all the allocated space upfront, so if a 100GB VV is created straight away 100GB of space will be used from the CPG. With a TPVV only the space that is demanded is used, so if a 100GB VV is created and only 50GB of that space is used only 50GB of space will be demanded from the CPG.

A thin provisioning licence is required to use TPVV and assuming this is in place TPVV are the default type of VV created. Today if you purchase a system you get the full licence bundle included and so this becomes less of a concern.

Another type of Virtual Volume was introduced with the 3PAR all flash systems.  The Thin Deduplicated Virtual Volume (TDVV) as the name suggested this was a volume that was both deduped and thin provioned.  3PAR OS 3.3.1 depreciated the TDVV volume type and made dedupe a property of a volume that could just be turned on. 3.3.1 also introduced the capability to enable compression on volumes.

Creating a VV and VLUN SSMC

Enough theory let’s get on and create a VV, first in the 3PAR SSMC:

1 Open SSMC and from the main menu select Virtual Volumes

2 Click the green Create Virtual Volume button on the top left of the screen

3 What appears next is the simple Virtual Volume creation screen.  The only information you have to supply is:

  • Name – the name you wish to call the Virtual Volume
  • System – If you are connected to more than one system, chose the system you want to create the volume on
  • Size  – How large the volume needs to be

Further fields you can change if you wish:

  • Provisioning – choose from thick or thin provisioning
  • CPG – Select a different CPG for storing the virtual volume in

4 If you want to create an additional volume you are done.  But if you need to set any of the following, choose Edit additional settings

  • Copy CPG – The CPG you want metadata and snapshots to be stored in
  • Number of volumes – if you want to create multiple volumes at the same time
  • Volume sets – Add the volume to a volume set
  • Comments – Add any comments you wish

5 Next we present the newly created volume to a host.  Still in the create virtual volume wizard select add

In the box that appears choose to export the volume to a host as below, or select to export it to a group of hosts using a host set.

To enable dedupe and compression on the volume follow the 3PAR Dedupe + Compression Deep Dive

Creating a VV –  CLI

This section looks at how we create a volume and then export it to a host using the command line.

createvv -tpvv -pol zero_detect NL_R6 VirtualVolume2 100G

Lets break down the CLI options a little

  • createvv – core command
  • -tpvv make thin provisioned volume
  • -pol zero_detect  scan for zeros on incoming writes
  • CPG name – in my case NL_R6
  • VV name – in my case VirtualVolume2
  • Size of volume – in my case 100GB

Creating a Vlun –  CLI

createvlun VirtualVolume2 auto host1
  • createvlun – core command
  • VV name – in my case VirtualVolume2
  • Lun ID – auto in this case
  • Hostname – host1

If you only use the new management tools for 3PAR that it your done, fineto. This blog has over 150+ 3PAR articles check out a selection of them here.  If you missed any of the 3PAR 101 series catch up on them:

Start here – Meet Chunklet!

3PAR 101 – Part 2 – CPG’s

3PAR 101 – Part 3 – Virtual Volumes and Vlun’s

Creating a VV –  3par management Console

If you still use the 3PAR management console then read on:

1     In the management pane select Provisioning and then from the common actions pane select Create Virtual Volume

VV1

2 Next you will see a welcome screen which has a lot of useful info on creating VV’s, if you do not want to see this again click the skip this step tick box and click next

VV2

3 The basic information you will need to complete when creating a VV is highlighted in the screenshot below.   Thin provisioned will be selected by default, enter the name and size and then the CPG you want the VV to sit in. Remember the CPG you choose will determine the performance and availability level of the volume. The copy CPG will only be needed if you use snapshots

4 The screenshot below shows what you will see if you tick the advanced options checkbox. Generally you can leave all this to deafult and will not need to select advanced options

VV4

5 The final screen shows a summary of the sections you have made, if you are happy just click finish here

Creating a Vlun – 3par management console

Next we need to export (provision) the virtual volume to the host

1 In the management pane select Provisioning and then from the common actions pane select Export Volume

VlunA

2 Next you will see a welcome screen which has a lot of useful info on creating VLUN’s, if you do not want to see this again click the skip this step tick box and click next

Vlun1

3 On the left hand side of the screen you need to select the name of the volume to export, on the right hand side you need to choose the host to export to. By ticking auto for export with LUN values it will automatically choose the LUN ID for you. When your happy with your selection click next

Vlun2

4 The final screen shows a summary of the sections you have made, if you are happy just click finish here

If you have missed it, check out parts One (3PAR architecture) and Two (CPG’s) of this 3PAR beginner guide series.

To stay in touch with more 3PAR news and tips connect with me on LinkedIn and Twitter.

Further reading

3PAR Concepts Guide

3PAR Best Practices