Re-cap
Previously I started my 3PAR 101 / beginners series with the post Meet Chunklet!, which has been one of the blogs most popular posts. Now it’s time to move on with the series.
Part 1 of the series dealt with 3PAR’s unique approach to RAID and found that several logical layers were created to enable this. As a quick reminder; Vluns are a virtual volume which has been presented to a host, Virtual Volumes draw their space from CPG’s, CPG’s are a pool of Logical Disks and Logical disks are chunklets arranged as rows of RAID set. If you’re still a bit hazy on all this check out Part 1 of this 3PAR 101 series where we covered all this is in detail.
The 3PAR building blocks that we have direct control over are CPG’s VV’s and Vluns and will be what you mainly work with day to day, this 3PAR 101 series will cover each of these components in turn.
What are CPG’s
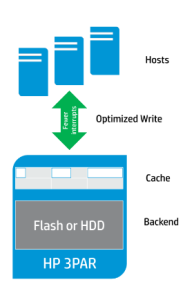
Without further ado lets crack on with looking at the first building block we will need to put our 3PAR to work, which is Common Provisioning Groups (CPG’s). A CPG is a pool of logical disks that virtual volumes will draw their space from. For simplicity if you have worked with other storage vendors you can think of a CPG as a RAID pool. However that is just to help to understand the concept, as a CPG also has many characteristics that make it different from a traditional RAID pool.
We know that CPG’s are a pool of space and the smallest building block that makes up that space is a chunklet. CPG’s effectively filter which chunklets are selected and how they are arranged, which in turn means CPG’s define performance and availability levels. There are three levels of availability port, magazine and cage. Port is the lowest level and protects against a backend port failure, magazine protects against the failure of a drive magazine and cage protects against an entire disk shelf failure.
Let’s look at a couple of examples below to help understand how CPG’s settings define performance and availability. CPG1 for example uses chunklets from FC disks, in a set size of 3 and availability of magazine. CPG2 is configured to use NL disks as RAID6 and a set size of 6 and an availability of cage. So CPG 1 will be higher performing but less available than CPG2.
CPG1 – FC, RAID 5, Set Size =3, availability= magazine
CPG2 – NL, RAID 6, Set Size =6, availability=cage
Upfront a CPG will consume no space it is only as virtual volumes demand space from it that it will autogrow. This is a big bonus as it eliminates the need to pre-allocate and pre-plan the size of the different CPG’s you need to create. Although with multiple CPG’s able to consume space from the same set of physical disks this does require that your capacity management needs to be more vigilant. Performance increases the more disks you stripe across, and so you will generally want to stripe all your data across all the available disks of that type in the system. Lastly you need to be aware that CPG’s will form the levels that the tiering software (AO) will work with, but more on that another time.
Summary
- CPGs are a pool of storage that define performance and availability characteristics
- Multiple CPG’s can exist on the same set of physical disks
- CPG’s grow on demand and so no space needs to be pre-allocated
- CPG’s should be striped across as many disks of the same type as possible to maximise performance
- The availability options for a CPG are HA cage, magazine and port. The CPG will default to the highest level of availability.
Creating a CPG – SSMC
Enough theory let’s get on and create a CPG, first in the 3PAR SSMC GUI:
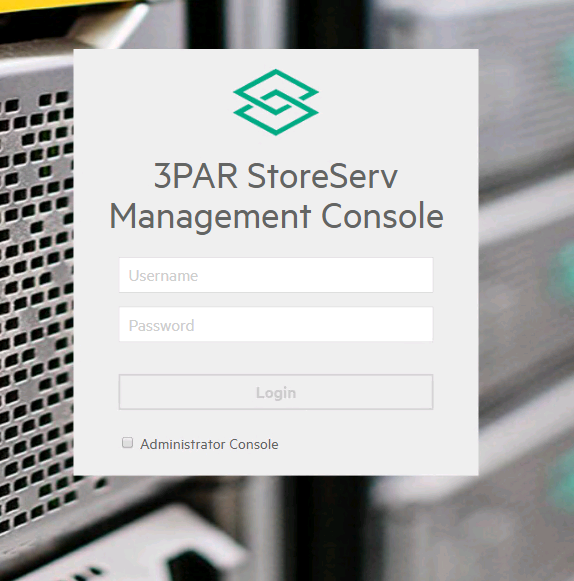
1 Open SSMC by opening a web browser and entering your SSMC web address in the following format:
https://SSMCserver:8443/#/login
Next logon with your credentials:
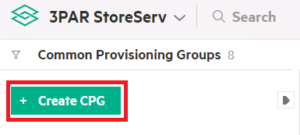
2 From the main menu choose Common Provisioning Groups from the Block Persona submenu. If this is not visible chose show more on the right hand side of the main menu

3 Click the green Create CPG button on the top left of the screen
4 What appears next is the simple CPG creation screen. The only information you have to supply is the name of the CPG, the rest will be set to default values. Lets go through each setting incase you want to change any of them
- Name – Try and call the CPG something logical for example CPG_FC_R6, so you can quickly see the disk and RAID type
- System – If you are connected to multiple systems. Chose the system you wish to perform the action on
- Device Type – Chose the physical disk type you wish to use for your CPG, this will default to FC disks.
- Availability – Sets the the availability level for the CPG. This will default to the highest level of availability available for your system, so I would suggest leaving this setting as is. In this case it is set to Cage availability, so we can loose an entire disk shelf and not loose data

When you are happy with your settings chose create
5 If you want to create a simple CPG you are done. But lets quickly look at what additional options ticking advanced options on the create CPG screen gives us:
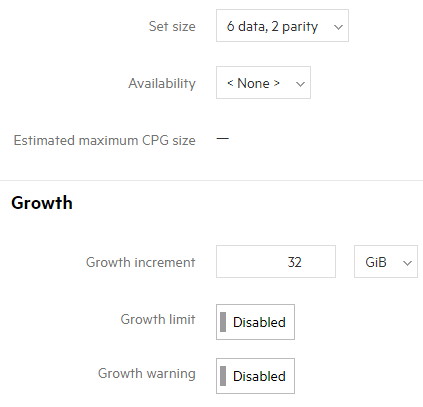
- Set size – The size of the RAID set. In this example the set size is 6+2 meaning 2 parity drives to every 6 data drives.
- Growth increment – The increment with which CPGs grow. Do not change this
- Growth limit – Don’t set this. Any limits set will act as a hard stop
- Growth warning – An alert will be sent out when this level is reached
Creating a CPG – CLI
Creating a CPG in the CLI is arguably simpler since it’s all done in a one line command
To create a CPG with all default options; that is to use all FC drives, in RAID 1, with an availability of cage
createcpg cpgname
You will probably want to have more control over your CPG creation. For example the following creates a CPG that is RAID 6, cage level availability, set size 6, on NL disks with the name NL_Raid6
createcpg -t r6 -ha cage -ssz 6 -p -devtype NL NL_Raid6
Lets break down the CLI options a little
- createcpg – core command
- -t specify RAID level eg RAID 6FC_R6
- -ha specify availability level eg cage
- -ssz set size eg a set size of 4 for a RAID 5 set would be 3 data and 1 parity
- -p –devtype specify the disk type eg NL for Near Line
If your down with the kids and use the modern management tools that’s it you can move onto Part 3 of this 3PAR 101 series which covers Virtual Volumes and Vluns. If you missed it, catch Part 1 when we talked about Chunklets and the fundamentals of 3PAR. If you still use the 3PAR Management Console read on:
Creating a CPG – 3PAR Management Console
1 In the management pane select Provisioning and then from the common actions pane select Create CPG

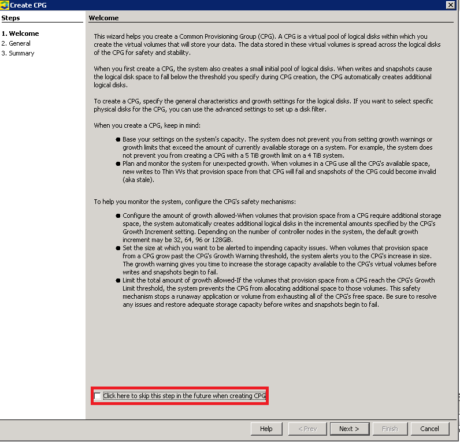
2 Next you will see a welcome screen which has alot of useful info on creating CPG’s, if you do not want to see this again click the skip this step tick box and click next
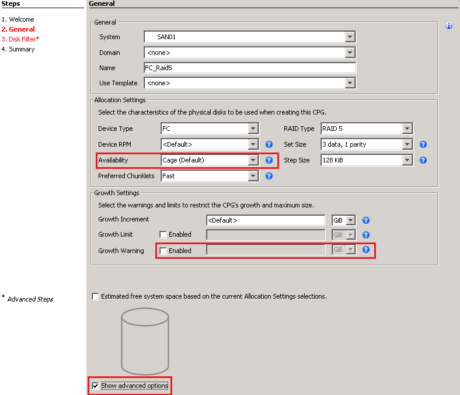
3 The basic information you will need to complete when creating a CPG is the name of it, the device type, RAID type and set size. Try and call it something logical, in this example I have called it a name that quickly tells me the disk and RAID type. Unless you have reason to change it leave the set size at default, increasing the set size will increase useable space but decrease performance

4 If you tick the advanced options box you will see some more options. I have highlighted in red the common values you are likely to want to change. Be cautious of changing advanced variables such as specifying fast / slow chunklets as you do not normally need to change these options. You will see the availability option, this will default to the safest option i.e. cage if it is available
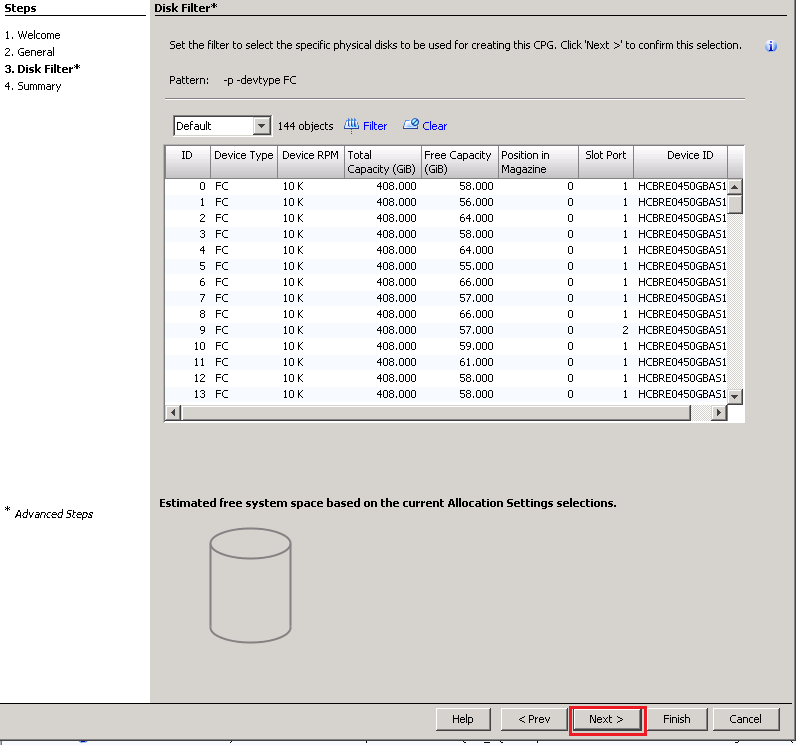
5 The next window will only appear if you have ticked the advanced option and allows you to filter on the disks to include. We want to stripe across as many disks as possible so just click next here
6 The last window just confirms the setting you have chosen. Once happy here just click finish
Next time we will be creating a virtual volume and exporting it as a Vlun. If you missed it, catch fundamentals of 3PAR of this 3PAR beginners guide series and also Virtual Volumes and Vluns).
To stay in touch with more 3PAR news and tips connect with me on LinkedIn and Twitter.
Further reading