HPE MSA Storage Array Health Check

HPE MSA Storage Array Health Check

This guest post is brought to you by Armin Kerl, if you fancy trying you hand at blogging check out our guest posting opportunities.

This Week HPE released the MSA Storage Array Health Check Web Site.

This tool was used in the past by HPE internal staff only, but is now public.

What does it for you?

It will analyze your MSA configuration and then give recommendations for:

  • Firmware Updates (Controller, Enclosure and Drives)
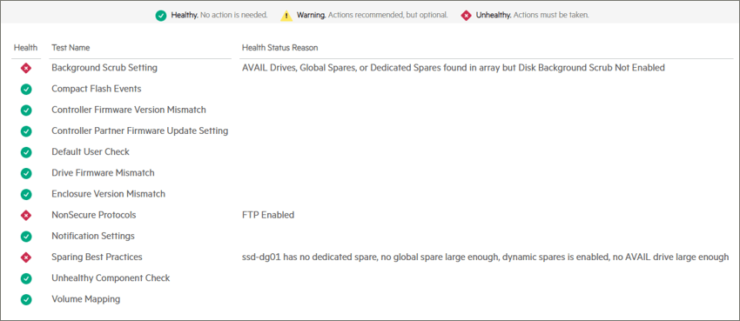
  • Best practices
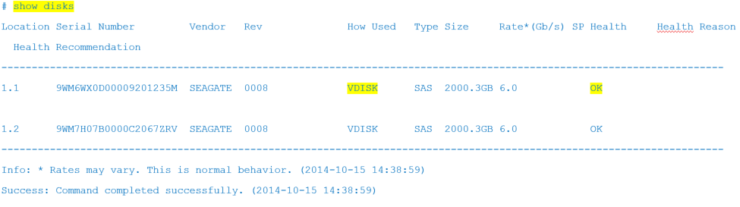
  • Unhealthy components
  • Find SSD Drives with “Power on Hour” Bug

MSA Health Check results

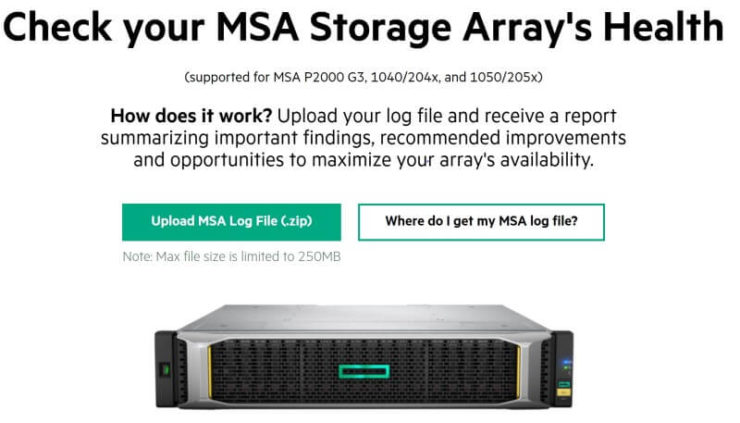
How to use MSA Storage Array Health Check?

It is simple to use you just go to this website: www.hpe.com/storage/MSAHealthCheck

and then upload the MSA Support Logs, to the site. If you do not know how, there is a description on the site  to guide you through the process.

HPE MSA Storage Array Health Check

HPE MSA Setup

HPE MSA Setup

This post walks through the initial install and setup of a HPE MSA.

Assign management IP address

Once you have your HPE MSA racked, cabled and powered on the next step will be to assign it a management IP. To setup the management IP you have two options:

1 Connect via CLI cable – Connect to one of the controllers using the supplied mini USB cable to plug into the CLI port.  You will need to use the connection settings and password supplied in the MSA 2040 User Guide.  Once connected the command to set the IP address details are:

set network-parameters ip address netmask netmask gateway gateway controller a|b

For example

set network-parameters ip 192.168.0.10 netmask 255.255.255.0 gateway 192.168.0.1

controller a

You can then check the settings with the command:

show network-parameters

2 Set with laptop and Ethernet cable – by default the controllers will have the IP address information:

  • Management Port IP Address: 10.0.0.2 (controller A), 10.0.0.3 (controller B)
  • IP Subnet Mask: 255.255.255.0
  • Gateway IP Address: 10.0.0.1

A Set an IP address on the laptop on the same range as the HPE MSA factory default

B Connect the laptop to the MSA with an Ethernet cable

C Open up a web browser and enter the IP address of one of the controllers e.g. https://10.0.0.2

D Click on system settings on the dashboard and as you run through the wizard you will be prompted to set the IP address information.

Update Firmware

Open a web browser and enter the new ip address to connect https://newaddress

When you first logon to the home screen it will prompt you to check if the firmware needs to be upgraded.

HPE MSA Upgrade firmware

Click on the Upgrade Firmware button and see which version of the firmware you are on.  You can check the latest version https://h41111.www4.hpe.com/storage/msafirmware.html. Download and apply the firmware update if necessary or just close the dialog box if the system is already up to date.

HP MSA Update Firmware

Basic System Settings

Click System Settings on the dashboard and this will run you through an initial configuration wizard to get the basics setup.

  • Date and time – Set the time manually or specify NTP server
  • Manage users – This gives you a chance to reset the default manage password and create any additional accounts
  • Install licence – Install additional licences
  • Network – This will be the IP addressees you set earlier so there should be no need for any action here
  • Services – Here you can set how the device can be managed ed via SSH or web

Once you have your basic system setup you can start to work through the steps to get the storage presented to hosts.

Hosts

You can see connected hosts by clicking hosts in the main left toolbar. Assuming you have already connected your hosts and completed any necessary zoning you will see a list of connected hosts. Select each in turn and choose modify from the action menu to choose a friendly name.

Creating a Disk Pool

Your first step in provisioning storage is to create a Pool, a pool is like a RAID group in which you define RAID type and disks to add.

HPE MSA Create Disk Pool

  • Select Pools from the left hand menu
  • Action menu, add disk group
  • Name the pool
  • Select which controller you wish to own the pool. Try to balance the pools across the controllers, so there is an even number of pools on each controller
  • Choose your data protection level aka RAID level
  • Select the disks you wish to add into the group
  • For RAID 5 and 6 you need to ensure that the number of data drives in the RAID group is divisible by two for best performance. RAID 6 is recommended for larger NL disks
    • RAID 1. Requires 2 disks.
    • RAID 5. Requires 3-16 disks.
    • RAID 6. Requires 4-16 disks.

Assigning Spares

You will need some spares to act as a hot standby should a disk fail.  Dynamic sparing is enabled by default which means that disks not assigned to a disk group will be counted as Global Spares which means that they can act as a spare for any disk group. Spare disks must be at least the same size as the disk they are standing in for.

It is best practice to have one global hot spare per disk group. So make sure you have the correct number and size of disks not in a disk group so they can be global hot spares.

Configuring the Read Cache

Configuring MSA Read Cashe Pool

An SSD disk can be added into a spinning disk group to act as a read cache to extend the size of the controller cache and improve performance.  To add an SSD read cache:

  • Select pools from left-hand tool bar
  • From the action menu choose add disk group
  • From the type drop down select read cache
  • Select an SSD and click add

Provisioning Volumes

Next you need to create your volumes which are effectively LUN’s.

Creating Virtual Volumes for HPE MSA

  • Select volumes from the lefthand tool bar
  • From the action menu choose create volume
  • Enter the name and size of the volume
  • Remember to balance volumes across controllers

The end result we end up with is as below. We have two volumes balanced across the two storage pools which themselves are balanced across the controllers.  By maintaining a one to one relationship between pools and volumes we reduce the complexity of troubleshooting and performance monitoring and this is also a recommended practice for performance as workloads will not be conflicting.

Volume summary


Mapping Volumes to Hosts

Lastly you need to map your volumes to your hosts.

  • Select mapping from the left hand menu
  • From the action menu choose mapping
  • Simply select the initiator you wish and then select the volumes to map to map it to and select map.


2040 firmware version check

HPE MSA Upgrade

Today we have a guest post covering the HPE MSA firmware upgrade process in excellent detail. If you fancy writing a guest post check out this post.

Introduction

Hi Guys,

First, let me introduce myself:

My name is Armin Kerl, I have been a HPE Master ASE for 20 years in Server & Storage starting at 1992 with Compaq Server Technology. I’m living with my Wife and Son in Germany and working for the last 15 Years for SWS Computersysteme AG (Member of ACP Group). In 2014, I got a nomination to the “HPE Partner Ambassador Program”. My primary focus is HPE Storage and Server as Senior Consultant. After Years of HP EVA Systems, today I am installing and managing around 50 3PAR Systems at 20 customer Sites. You can learn more about me by connecting on LinkedIn.

HPE MSA Upgrade Background

Now let me share some tips for updating your HPE MSA & P2000 Storage Systems. HPE has released a new Microsite for “HPE MSA Storage Firmware & Release Notes” http://www.hpe.com/storage/MSAFirmware Well done HPE, I wish we could of had this for the last 20 Years. From here you can find and download all the necessary firmware for the MSA.

Before starting the Update, remember, it is always a good Idea to have a Backup. I have had issues where multiple drives have a malfunctioned after the update and data was put at risk. In addition, you should have a support contract if the system production, best is 4h response Time. I have had experience of where one controller goes down during a firmware update.

All the Issues I have had were with P2000 systems, until now I have seen no firmware update problem with MSA204x or MSA205x Systems and have read that the newer MSA Storages HPE updates are improved.

As today, you have still search and download for every Drive Type the Firmware Version. If you scroll down the new MicroSite you can find the “HPE MSA Hard Disk Drives – Hard Drive Model Number Matrix”.

For the P2000 Systems HPE Support told, that is best practice to have no IOs (or minimum IOs) during the Update. Even if Online Update is supported. I have had many Issus by Updating and always shut down all Systems, if in Production.

For MSA204x and MSA205x, I decide not to Shut Down all Systems, but shutdown databases (Exchange, SQL, Oracle,…) and doing it to Low IO Times. So long, I have no trouble.

Now here is my Action Plan:

1 Prepare the System

Connect via putty:

1a Check if System is OK

#show version

#show network

#show system

System Information

------------------

System Name: P2k05

System Contact: xxxxxxxxx

System Location: xxxxxxxxxxxxxx

System Information: P2000 G3

Midplane Serial Number: xxxxxxxxxxxx

Vendor Name: HP StorageWorks

Product ID: P2000 G3 FC

Product Brand: MSA Storage

SCSI Vendor ID: HP

SCSI Product ID: P2000 G3 FC

Enclosure Count: 2

Health: OK

Note health shows as OK

1b Check if all VDisks are “Fault Tolerance Online” (FOTL) and have no Job:

Output from vdisk FTOL commandIf Disk Scrub (VRSC) active, then abort

#abort scrub vdisk BKRSDS1_RG2-0

Info: Scrub was aborted on vdisk BKRSDS1_RG2-0. (BKRSDS1_RG2-0)

Success: Command completed successfully. (2014-10-15 09:53:46)

Another example

vdisk is initalising

This Disk is Initializing:

If other jobs active or volumes are not FTOL than, cancel update and schedule new, if system is OK then continue

1c Check if disks are OK:

show disks output

Example:This disk is initializing:

1d     Check if unwritten Data is in Cache

# show unwritable-cache

Percent not written Cache in Controller A: 0

Percent not written Cache in Controller  B: 0

If there is:

# clear cache volume (Name)

1e Disable Partner Firmware Update

# set advanced-settings partner-firmware-upgrade off

1f you powered off hosts and check, there are no IOPS. Below we can see IOPs are still present, we would like to see this at zero

This is all the pre-upgrade steps

2 Firmware Update Controller

Download ” Online ROM Flash Component for Windows – HP P2000 / MSA 1040/2040 Storage Arrays”.

http://www.hpe.com/storage/MSAFirmware

Always use the Windows EXE for Firmware Update; this is using special Script’s.

The Firmware Update Tool connects to the Controller over IP and takes aprox 30 min. per Controller.

Running the Windows online ROM flash component for MSA firmware update

3 After Update check if it is OK

After the Update login to the Web GUI go to Tools > Firmware Update. Check, if both Controllers have identical Firmware versions.Often on P2000 Systems with older firmware sometimes, parts of Firmware were not updated.

This is P2000 with c2 GUI:

Checking firmware versions, post upgrade

checking firmware version for the MSA controller

And here in the newer v3 GUI:

MSA2040 update firmware

2040 firmware version check

4 Firmware Update Disk Shelf

Download the ” Online ROM Flash Component for Windows – HP MSA 2040/P2000 Dual I/O LFF or SFF Drive Enclosure”.

This Process is only OFFLINE supported; meaning no IOPS. Each IO Module need around 15 minutes.

update expansion modules

5       Firmware Update Disks

Login to the Web GUI and go to Tools > Firmware Update

Look at the Disk Types, than download the „Firmware Flash Component for Windows – HP MSA 1040/2040, P2000 G3 and MSA2000 …..”, if there is some newer.The Disk Firmware Update Tool connects over the IP to the Controller and does an update of the disk.

If different Disk Types are installed, than repeat this for every type. Per Disk it will need about 5 Minutes

6  Check if Disk Update is OK

update disk drives firmware

.