HP 3Par Upgrade Checklist

As I went though the HP 3 Par Inform OS upgrade process I created a check list for quick reference of the things that need doing. I have shared it below, but please double check this list against the official HP documentation to ensure all points relevant to your environment and version you are upgrading to are covered.

Pre-Upgrade Checks

  1. Hosts
  • Check compatibility of components. You can complete this step yourself by using SPOCK or send off a completed host worksheet to HP who will verify the compatibility for you. Items to checks for compatibility are: HBA model, HBA driver, HBA firmware if boot from SAN, MPIO driver, fabric switch firmware version. Depending on the results of the checks upgrade HBA, multipath and switch software as necessary
  • Check MPIO set to round robin on Windows 2008 servers using the native MPIO driver. Process using psexec covered here under point 2
  • LUN’s marked as offline following reboot – Apply KB2849097 to all connected Windows 2008 and 2012 hosts to stop this.
  • There are also some hotfixes related to running ESX hosts VM’s with pass through or Iscsi LUN’s. KB275704 and KB2821052


2. SAN

  • Load must be below 50% at the time of upgrade. Run statcpu and statport and check utilisation is below 50%
  • Check current version is on upgrade path. showversion
  • Check the system is healthy. checkhealth


Day of upgrade

      • Load must be below 50% at the time of upgrade. Run statcpu and statport and check utilisation is below 50%
      • If possible suspended tasks that would cause a heavy load eg backups

Stop AO, DO, and RC tasks before the upgrade. Plus stop anything else that interacts with:

      • Suspend AO and other scheduled tasks setsched -suspend_all
      • Stop system reporter. Stop windows service – 3Par System Reporter Sampler Service
      • Showtask – and check for any DO activity
      • Stop remote copy on both primary and DR site. stoprcopygroup [option] <group_name>,stoprcopy [options].
      • Stop any software that directly interact with the SAN e.g. Recovery Manager, scripts etc.
    • Check no one is logged in showuserconn
    • Checkhealth again. checkhealth -svc detail performs a full health check on the system
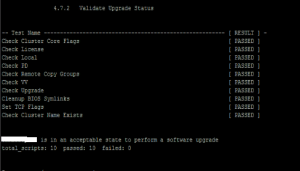
    • checkupgrade to verify if the system is ready to undergo an ONLINE upgrade.
    • Check current connectivity status of the hosts showhost -pathsum

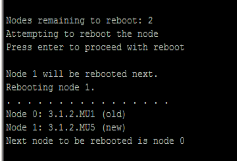
All upgrades until after 3.1.3 are performed by HP.  If you would like to see more details on this step check here Part 3


Post Upgrade

    • Check version is as expected showversion –a -b
  • Verify connectivity of hosts showhost –pathsum, plus check monitoring software attached hosts etc. for any potential issues
  • Restart suspended tasks setsched -resume_all . Check schedules running again showsched
  • Restart system reporter windows service (3Par System Reporter Sampler Service) plus any other software you stopped such as Recovery Manager
  • Resume backups and any other systems you suspended to reduce the load on the SAN
  • Restart Remote Copy
  • Check for new CLI and management console from FTP supplied by HP or software depot.  Check compatibility in SPOCK
  • Plus if you use any other 3Par software such as Recovery manager VSS provider etc check in the release notes for the latest version and then download via supplied FTP link from HP or from the software depot
  • Remove default CPG. removecpg

Catch the full series of posts in which I ran through the upgrade process in detail, Part 1, Part 2, Part 3


HP 3Par Upgrade Part 3 – Upgrade Day!

Good times, upgrade completed successfully at the end of last week! We were planning to go to 3.1.2 MU3 but when HP got in touch with me on the day of the upgrade they advised 3.1.2 MU5 was available for our system, the requirements and pre-upgrade checks would be identical. MU5 also contains all previous patches and so there would be no need to run the individual patches we were planning. I asked what happened to MU4 as a number seemed to have been skipped in the sequence and found out that this version had been released specifically for an individual customer.


HP were due to perform the actual upgrade. About an hour before the upgrade was due to begin I completed the following pre-upgrade steps and checks.


    • Check CPU and port usage is below 50%. statcpu -iter 1, statport -iter 1
    • Suspend tasks. setsched -suspend_all, check tasks are suspended as expected showsched
    • Check for any DO activity. showtask –active, for any tasks that are active canceltask taskID
    • Stop system reporter by visiting the machine its installed on and stopping the Windows service

  • Check for any connected users who may be making changes to the system showuserconn
  • Check the connectivity of hosts before the upgrade. showhost –pathsum, I took a screenshot of this so I could verify connectivity was as before after the reboot of the first node
  • Verify health is OK to do upgradecheckhealth –svc
  • Check the system is ready for upgrade checkupgrade
  • Plus I suspended all backups so the system was as quiet as possible

Next it was time to hand over to HP. The high level steps and expected timing was as follows:

Updating New codes on the service Processor – 60 Minutes (non-intrusive, can be performed in advance, VIRTUAL ROOM)

Performing the pre-upgrade checks – 30 Minutes (non-intrusive)

Node Upgrade to the new InForm OS – (15 Minutes per node) + 5 pause time =  40  minutes

Performing Post Upgrade Check and patch installations – 30 Minutes (non-intrusive)

Drive cage and Drive Firmware update – 110 Minutes for 7 cages (will be run as a background task & monitored till completion (non-intrusive)


Updating the Service Processor

I connected with the HP representative, who was very helpful via a virtual room. From HP’s FTP site he downloaded the update for the Service Processor and Inform OS. Next he disabled alerting in the Service Processor and chose to run the Service Processor update ISO. This stage was completed quite quickly and next he moved onto loading the Inform OS to the Service Processor.

Health Checks

Next was the health checks, again we moved quite quickly through this as I had ran most of them myself before the upgrade. In addition to the checks I ran above he also ran the following commands:

showsys –d, showversion –a –b, showpd –failed –degraded, shownet, showalert, shownode, showcage, showbattery, showport –d

Node Upgrade

The Inform OS update had already been loaded to the Service Processor so the next stage was to stage the new code to the controllers. This was achieved by connecting through SSH to the Service Processor and running a bunch of commands to transfer the files. When the upgrade was kicked off I took a handful of screenshots to show roughly what happens.

Frist the upgrade goes through some pre-upgrade checks

Next the staged software appears to be transferred so it is ready to be actively installed

Next node 0 reboots and picks up the new code

 There is then a pause between reboots of the nodes during which HP will allow you to check all looks OK. I checked our alerting software, checked all VM’s were still online and ran a showhost –pathsum to check that all paths and accessibility to nodes was OK. Before the last node reboots HP are able to roll the upgrade back in an online manner, once the last node has been upgraded this must be done offline. All looked good in my case so I let the upgrade continue.

Post upgrade checks

Once both nodes were upgraded the HP engineer then ran the following checks Shownode, Showversion a – b, and then re-enabled scheduled tasks with Setsched_resume_all

Cage and Drive Firmware Upgrade

Next it was time to upgrade the firmware of the cages, this was kicked off with the command starttask upgradecage –a. To check the task was running the following commands were run: showtask –active and then we were able to drill down for more details by running showtask –d taskID. Progress was also monitored by running showcage. In the screenshot below you can see that about half the cages were done at this stage with half on 320f and half on 320c (you can see this in the RevA and RevB column).

Once the cage firmware upgrade is completed it’s time to upgrade the firmware of the disks. Showpd –failed –degraded, those disks that require a firmware upgrade will show as degraded. To kick off the disk firmware upgrade run admithw. Progress can again be monitored though showtask and re-running Showpd –failed –degraded. To do all the disks and cages in our 7 cage system took about 1.5 hours.

Admithw appears to recreate the default CPG’s. I don’t like these to be there in case someone accidentally adds a VV to them so I did a showcpg to double check they contained no VV’s and then removed them with removecpg

I then ended the remote session with the HP engineer and took the following final steps

  • Kicked backups off again
  • Restarted system reporter service on system reporter service
  • Checked for new alerts showalert –n
  • Check the hosts path showhost –pathsum
  • Ran a checkhealth
  • Checked all VM’s were online without issues
  • Checked our monitoring software
  • Updated software – CLI and management console. This was again downloaded from HP’s FTP site and was a simple case of just clicking next through the install wizard.


That was it all done with zero down time or issues. For my first 3Par upgrade I was very pleased with how it had all run.


Catch parts one and two in this 3 Par upgrade series if you previously missed them


HP 3Par Upgrade Part 2 – Hosts

Over the past few days I have been completing all the pre-upgrade host checks for the 3Par OS upgrade to ensure a successful upgrade. Here are the steps I’ve taken:


1 Check compatibility of components – This is to ensure that you are running a tested configuration of components that have been proven to work together by HP. There are 2 ways to go about this. Firstly you can use SPOCK.  This site contains all the compatibility information you will need to complete your own checks. Or you can complete a host worksheet and return it to HP who will then verify the compatibility of all your components and firmware versions. The components you need to check are fairly standard to any SAN upgrade – Server OS, multipath software, HBA’s and fabric switch firmware versions.

In my case as this is the upgrade of our largest datacentre I did both. My checks matched up with HP’s with only once cluster requiring a HBA driver upgrade. This upgrade is done so onto the next stage

2 Check load balancing is set to round robin –  This is a requirement for any Windows servers running 2008 and using the native MS MPIO driver. As I have over 40 hosts to check I didn’t want to have to visit this manually. So I managed to get a script to do it, here is how:

I used the Microsoft command line application mpclaim to view the multipath configuration. Specifically I ran mpclaim –s –d from the command line.

To run the command line on multiple servers remotely without having to logon I used psexec. You can download it from here . Here is an excellent article on how to use it: psexec guide

In this case I used it in the following way

A Choose the server you want to run the script from and create a folder on it called C:scripts. Copy psexec to this folder

B in C:scripts create a file called 3par_servers.txt. Populate this with a list of the servers you wish to check for multipath configuration

C Also in C:scripts create a batch fie called mpclaim.bat and enter the following command line into it mpclaim –s –d

D Finally, open a command line from the machine you wish to run the script on, change directory to C:scripts and then enter c:Scripts>psexec -c -f @C:scripts3par_servers.txt C:scriptsmpclaim.bat

E You should then see the window populate with the information you require. An example of the output is below:

\Server1

C:Windowssystem32>mpclaim -s -d

For more information about a particular disk, use ‘mpclaim -s -d #’ where # is the MPIO disk number.MPIO Disk   System Disk LB Policy   DSM Name

——————————————————————————-

MPIO Disk5   Disk 6       RR           Microsoft DSM

MPIO Disk4   Disk 5       RR           Microsoft DSM

MPIO Disk3   Disk 4       RR           Microsoft DSM

MPIO Disk2   Disk 3       RR           Microsoft DSM

MPIO Disk1   Disk 2       RR           Microsoft DSM


Check LB policy appears as RR for all volumes.

3 Preventing LUN’s being marked as offline following reboot – On the first Windows Server 2012 or Windows Server 2008 reboot following an HP 3PAR array firmware upgrade (whether a major upgrade or an MU update within the same release family) the Windows server will mark the HP 3PAR LUNs offline but the data remains intact. To prevent this it is recommended that KB2849097 is applied to all attached Windows 2008/2012 hosts


It is essentially a PowerShell that changes the registry value to 0 for HKLMSystemCurrentControlSetEnumSCSI<device><instance>DeviceParametersPartmgr. The value is responsible for the state of HP 3PAR LUNs following an array firmware upgrade and a 0 indicates they stay online.


Windows Server 2008/2012 requires the PowerShell execution policy to be changed to RemoteSigned to allow execution of external scripts you can control this through a GPO. Or again amend through a PowerShell command


I got our PowerShell guy to look into if there was a way to the script against all hosts remotely but didn’t have much luck with this. It’s something I will have to look into for future upgrades, but on this occasion I had to log into each host individually and run the script.

So once you have ran the script in KB2849097 you can check its set the registry value as expected value by running: the PowerShell commands


Get-ItemProperty –path “HKLM:SYSTEMCurrentControlSetEnumSCSIDisk*Ven_3PARdata**Device ParametersPartmgr” -Name Attributes


The value returned should then be 0


4 VM’s on ESX running pass through disks. The following wasn’t relevant to our environment but if you are running ESX with raw device mappings check out KB2754704 and KB2821052


That’s it host checks complete! Onto the next stage

If you missed the first part of this series catch it here:

HP 3Par Upgrade Part 1 – Planning