Upgrading Brocade Switch Firmware

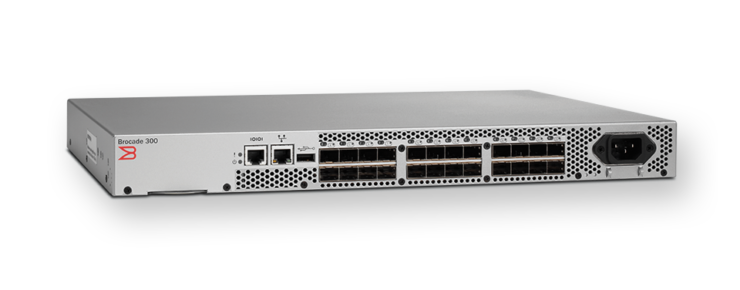
This post discusses the process to update a Brocade Fibre Channel switch. You will require an FTP server to complete the process.

Pre-Upgrade Tasks

Before updating the Fabric OS on your Brocade switches complete the following steps:

1 Find the current firmware version and check compatibility. Check the current firmware version by entering at the CLI

firmwareshow

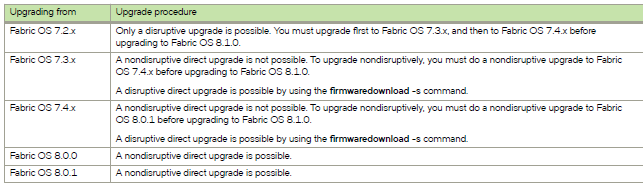
Verify the upgrade path from within the Brocade Fabric OS Upgrade Guide which you will find in the Brocade document library. As shown in the table below upgrade between one release is online more than this will require a reboot of the switch.  So check you are happy with your multipathing setup on hosts before continuing.

If you have other switches connected to the switch you are upgrading check for computability in the Brocade Fabric OS Release Notes.


Table showing fabric OS upgrade paths for Brocade switch

2 Backup the Brocade FC switches

3 Run a Brocade supportsave

4 You can also run an errclear to clear all existing stats

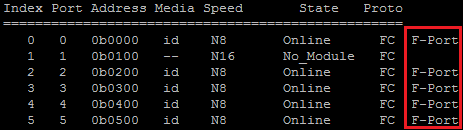
5 Check no ports are G ports

switchshow

Scrteenshot of Brocade switch showing no G ports present

6 Check that no firmware upgrade is already in progress

firmwaredownloadstatus

7 If the switches are in a fabric run the commands below and take a note of the setting.  You will run these commands again after to ensure the fabric is healthy

nsshow

nsallshow

fabricshow

7 Download the switch firmware from Brocade

8 Extract the Zip file and place it on your FTP server

Upgrading the Brocade switch firmware

1 Connect to the switch with an admin account

2 Enter the command firmwaredownload and follow the prompts.  If you are upgrading from 7.4.x or earlier you will need to use firmwaredownload -s.  firmwaredownload -s just commits the updated firmware to one partition you manually need to commit it to the second.  This can be a useful way of testing an update and reduces the risk of upgrade.  This is the procedure that is covered in this post, once you are happy with the update you will commit to both partitions

firmwaredownload 

3 Follow the prompts:

Enter the IP address of the FTP server

Host IP or Host Name: 10.10.10.5

Enter a username with access to the FTP server

User Name: anonymous

Enter the location of the firmware upgrade files. In the example below I have copied the upgrade files for v8.1.0 to the root directory of the FTP server

File Name: v8.1.0/v8.1.0c

Select the protocol the FTP server uses

Protocol (ftp | scp | sftp): ftp

Enter the password for the user account you selected

Password:

4 You will then see the switch update begin which will take aprox 30mins.

2 switch update progress

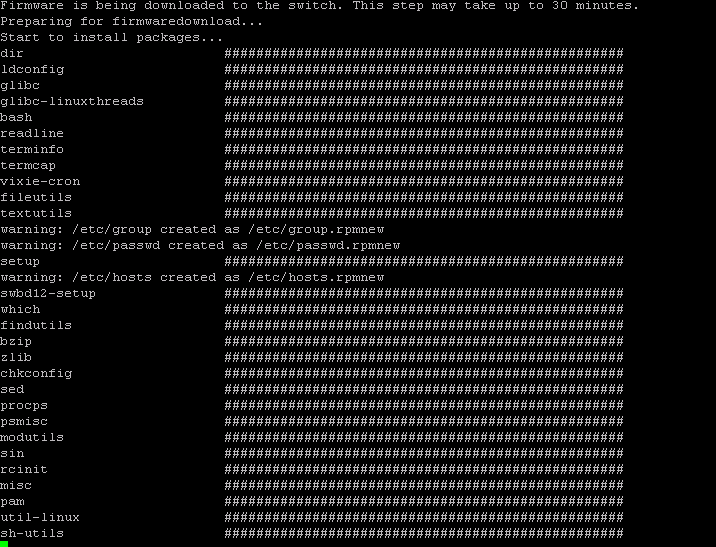
You can see all the steps  that were taken taken below

FCSWITCH1:admin> firmwaredownload -s
Server Name or IP Address: 10.10.10.5
User Name: anonymous
File Name: v8.1.0/v8.1.0c
Network Protocol(1-auto-select, 2-FTP, 3-SCP, 4-SFTP) [1]: 2
Password:
Do Auto-Commit after Reboot [Y]: n
Reboot system after download [N]: y
Server IP: 10.10.10.5, Protocol IPv4
Checking system settings for firmwaredownload...</spanSystem settings check passed.>

Post Upgrade Checks

1 Once the upgrade is running you can check progress using:

firmwaredownloadstatus
 [1]: Tue Aug 15 21:46:28 2017
 Firmware is being downloaded to the switch. This step may take up to 30 minutes.

[2]: Tue Aug 15 21:52:21 2017
 Firmware has been downloaded to the secondary partition of the switch.

2 When the process is finished you can check the switch firmware (Fabric OS) is at the expected version

firmwareshow 


Appl     Primary/Secondary Versions
------------------------------------------
FOS       v8.1.0
          v8.1.0

3 If your switch is in a fabric check the fabric is healthy with the following commands and check against the values you noted earlier

fabricshow

nsshow

nsallshow

If you ran the firmwaredownload without the -s command, that’s it your done. If not you can let things run for a bit and then you need to commit the firmware to the second partition

Committing the firmware

1 Enter the command below to confirm the primary partition is running the correct level of firmware

firmwareshow

2 Next commit the firmware

firmwarecommit

4 You can view the progress of the update

firmwaredownloadstatus

5 Finally now check that both partitions are running the correct firmware version

firmwareshow


Brocade clear port stats

Before you start working with a brocade switch or when trouble shooting it can be useful to clear the port stats.  We will look at how to clear individual ports stats and clear all the stats from the brocade switch.

To view the current stats and errors for a port use the following command:

porterrshow

The following commands will allow us to clear these stats to see if any error counters are increasing.

To clear the stats for a single port:

portstatsclear portindex

For example to clear the stats on port 1

portstatsclear 1

To clear the stats for a range of ports

portstatsclear -i portindex1-portindex2

For example to clear the stats on port 1-5

portstatsclear -i 1-5

To clear all the switch port and diagnostic switch in one go

statsclear

Configuring a Brocade switch in access gateway mode

What is access gateway mode?

Brocade switches enabled in access gateway mode act as an extension of the existing fabric, they have no zoning configuration on themselves and all traffic is transferred over uplink ports to a upstream switch containing the zoning information. This is a way to add more ports to your fabric without the complexity of additional switches containing zone configurations. When you enable access gate way mode a number of ports will automatically be designated as N ports and the rest F ports. You will cable the hosts into the F ports and the N ports will be connected to the upstream switch. That’s the theory, lets walk through the steps to implement access gateway mode.

Example Brocade switch that can be enabled for access gateway mode

Checking upstream switch

Before you start you need to make sure the upstream switch to the access gateway (AG) switch will connect to has NPIV enabled.

1 Check NPIV is enabled.

portcfgshow

2 If necessary enable for NPIV using

portcfgnpivport

Configuring access gateway mode

To put the switch in access gateway mode follow these steps. It is important to note that all zoning information on the switch will be lost.

1 Backup the current config of the Brocade switch

2 Check the switch is in native mode = 0. You can check this by running switchshow and checking the mode

To change it

interopmode 0

3 Disable the switch

switchdisable

4 Enable access gateway mode

ag --modeenable
WARNING: Access Gateway mode changes the standard behavior of the switch. Please check Access Gateway Administrator's Guide before proceeding.

Enabling agmode will remove all the configuration data on the switch

including zoning configuration, FAWWN configuration and security database. Please backup your

configuration using configupload.

This operation will reboot the switch.

Do you want to continue? (yes, y, no, n): [no] y

5 Check access gateway mode is enabled as expected

ag --modeshow
Access Gateway mode is enabled

6 To see how the automatic port mapping has been configured run

ag --mapshow
N_Port Configured_F_Ports     Static_F_Ports Current_F_Ports Failover Failback PG_ID PG_Name

------------------------------------------------------------------------------------------------

0   15;16                   None           None             1       1         0   pg0

17   1;2                     None           None             1      1         0   pg0

18   9;10                   None           None             1       1         0   pg0

19   3;4                     None           None             1       1         0   pg0

20   11;12                   None           None             1       1         0   pg0

21   5;6                     None           None             1       1         0   pg0

22   13;14                   None           None             1       1         0   pg0

23   7;8                    None           None             1       1         0   pg0

------------------------------------------------------------------------------------------------

Amending Access Gateway POrt Mappings

If you are happy with the default port mapping you are good to go. If not you can amend them as follows

1 Before adding into a new port mapping you must remove a port from its existing mapping

ag --mapdel N_Port “f_port1;f_port”

For example

ag --mapdel 0 "15;16"
F_Port to N_Port mapping has been updated successfully

2 Create the new port mappings

--mapadd n_portnumber f_port1;f_port2

For example

ag --mapadd 17 "1;2;9;10"
WARNING: Mapping F_Port(s) to this N_Port may cause the F_Port(s) to be disabled

Do you want to continue? (yes, y, no, n): [no] y

F_Port to N_Port mapping has been updated successfully

Read more in the Brocade admin guide.

More Brocade content

Moving a Brocade Port Licence

Brocade FC Switch Supportsave

Backing up a Brocade switch