The 3PAR ASIC now and the future

A great article appeared in The Register recently previewing the HPE 3PAR GEN 6 ASIC. It sparked my interest as it not only gave some clues to the direction of 3PAR but reminded me that I hadn’t written a post yet covering the ASIC. So this is a post of two halves, the first covering the background and architectural importance of the ASIC followed by a summary of the GEN 6 news and what clues it may give us to the future.

3PAR ASIC Overview

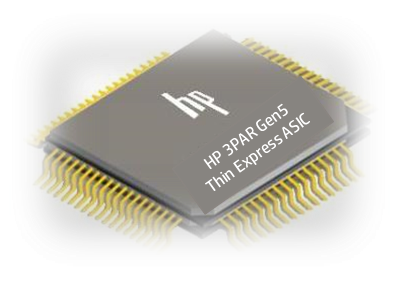
I have heard HPE staff describe 3PAR’s ASIC as its secret sauce many times, what is for certain is that it’s right at the heat of its architecture. Let’s start at the beginning, an ASIC stands for Application Specific Integrated Circuit, this describes quite succinctly what it is – an integrated circuit which has been customised for a specific use.


As an ASIC is hardware based having this at the heart of your architecture is not a decision to be taken likely, since you need to design it not only to deliver the features you require today but for the life cycle of that model i.e. 5+ years. Software based vendors have long argued that their approach is simpler and does not require the skill of predicting the future, if you need a new feature write it in. When I have been lucky enough to meet the 3PAR development team they have said on a number of occasions that they always consider the future of the ASIC in each new generation, but that so far they still believe that the ASIC is the best design for now and moving into the future.

ASIC


The models over the past few years feature the ASIC generation as follows:

  • 3PAR 8000 and 20, 000 – GEN 5
  • 3PAR 7000 and 10,000 – GEN 4
  • 3PAR F and T – GEN3
  • Generations before – I am too young to remember


To give you a feel for some of the features that currently harness the ASIC and the benefit they deliver I have summarised below:

  • Persistent checksum – don’t let my data corrupt
  • Mixed I/O processing – let me do BIG and little transactions without losing performance
  • Zero detect – one weird trick to stay thin
  • Dedupe – no doppelgangers, one of anything is enough
  • RAID parity calculations – stripe me like it’s hot

Key Gen 6 news

  • GEN6 Expected to Ship in 2018, it would seem logical this will be when the next generation of 3PAR will also ship
  •  The ASIC will be designed to be media agnostic and cope with all comers. This again continues down the current line of thinking of making 3PAR an I/O processing machine and will be important with 3D XPoint and memoristors round the corner
  • Improvements in storage networking such as NVMe will drive the need for even faster storage devices
  • Data services such as SnapShots will aim to complete quicker again to meet this future need for speed

Do take the time to check out the excellent full article on The Register.

HP 3Par Replacing a Failed Disk

Replacing a failed disk in a 3PAR is pretty simple you just need to follow a few steps to make sure you do it safely. If you are new to 3PAR or would like to learn more a good place to start is our 3PAR beginners guide

Let’s get started with the disk replacement procedure:

1 Check to see if you have any failed or degraded disks in the system. Take a note of the disk ID and cage position. In this case disk ID =26, cage position = 2:8:0

3PARSAN01 cli% showpd -failed -degraded

                           -Size(MB)-- ----Ports----

Id CagePos Type RPM State   Total Free A     B     Cap(GB)

46 2:8:0? FC   10 failed 417792   0 ----- -----     450

------------------------------------------------------------

 1 total                  417792   0

2 Check if the disk sevicemag command is running on the drive. The servicemag command is used to inform the system to evacuate all the chunklets from a drive so that it is ready for service. Below we can see the servicemag has succeeded on the drive we identified in step 1.

3PARSAN01 cli% servicemag status

Cage 2, magazine 8:

The magazine was successfully brought offline by a servicemag start command.

The command completed Thu Jul 10 20:07:03 2014.

servicemag start -pdid 46 – Succeeded

3 Next we double check there is no data left on the drive. You can do this by running showpd –space driveID as below. You need to check that all columns other than size and failed are zero

3PARSAN01 cli% showpd –space 46


Id CagePos Type -State-   Size Volume Spare Free Unavail Failed

46 2:8:0? FC   failed 417792     0                 0     0          0         417792

---------------------------------------------------------------

1 total                        417792     0            0   0          0        417792


4 Next to replace the physical disk. Make sure you are happy with the above steps. Then pop that bad boy out, you will have a note of the location of the failed drive from step 1.


5 Once the disk is in you can monitor the progress of the rebuild by running servicemag status, which will give you an ETA for completion.

3PARSAN01 cli% servicemag status

Cage 2, magazine 8:

The magazine is being brought online due to a servicemag resume.

The last status update was at Thu Jun 26 12:09:19 2014.

Chunklets relocated: 73 in 50 minutes and 34 seconds

Chunklets remaining: 400

Chunklets marked for moving: 400

Estimated time for relocation completion based on 41 seconds per chunklet is: 4hours, 57 minutes and 39 seconds

servicemag resume 2 8 -- is in Progress

6 Once this is complete you can check that your disks are showing in a normal state with showpd -state

3PARSAN01 cli% showpd -state

Id CagePos Type -State- --------------------Detailed_State---------------------

43 2:5:0   FC   normal normal

44 2:6:0   FC   normal normal

45 2:7:0   FC   normal normal

46 2:8:0 FC   normal normal

47 2:9:0   FC   normal normal

That’s it, job done! This blog has over 150+ 3PAR articles we have put together a selection of the best articles for you to learn more about 3PAR


To stay in touch with more 3PAR news and tips connect with me on LinkedIn and Twitter.

How to Get the Serial Number for Your 3Par

Getting the serial number for your 3PAR is one of those regular things you will need to do when you call HPE. What you will find with the 3PAR is that it has 2 serial numbers. A 3PAR and HPE Serial number. This blog has over 150+ 3PAR posts be sure to check out this collection of the best 3PAR posts.

3PAR Serial Number

The 3PAR serial number is easy to find and there are several ways to do it:

Command line - showsys

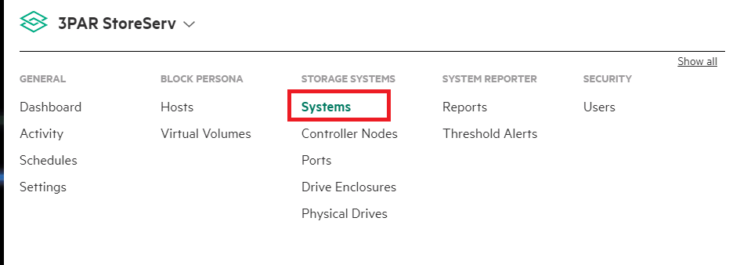
SSMC – From the main menu select Systems, then in the General area you will see the serial number

3PAR Management Console – as soon as you log in to the GUI you will be taken to the dashboard view and you will see it here as the third item down on the right, shown in the screenshot below.

HPE Serial Number

When you call support they always seem to need to convert the 3PAR Serial number into a HPE one and then log the case. So to save time you can get the HPE serial number by running from the CLI:

shownode -i –svc

Under the nodes section of the output you will see the HPE serial numbers listed as scalable serial.

Want to learn more about 3PAR? Check out this 3PAR 101 Guide

To stay in touch with more 3PAR news and tips connect with me on LinkedIn and Twitter.