

This post walks through the initial install and setup of a HPE MSA.
Assign management IP address
Once you have your HPE MSA racked, cabled and powered on the next step will be to assign it a management IP. To setup the management IP you have two options:
1 Connect via CLI cable – Connect to one of the controllers using the supplied mini USB cable to plug into the CLI port. You will need to use the connection settings and password supplied in the MSA 2040 User Guide. Once connected the command to set the IP address details are:
set network-parameters ip address netmask netmask gateway gateway controller a|b
For example
set network-parameters ip 192.168.0.10 netmask 255.255.255.0 gateway 192.168.0.1

controller a
You can then check the settings with the command:
show network-parameters
2 Set with laptop and Ethernet cable – by default the controllers will have the IP address information:
- Management Port IP Address: 10.0.0.2 (controller A), 10.0.0.3 (controller B)
- IP Subnet Mask: 255.255.255.0
- Gateway IP Address: 10.0.0.1
A Set an IP address on the laptop on the same range as the HPE MSA factory default
B Connect the laptop to the MSA with an Ethernet cable
C Open up a web browser and enter the IP address of one of the controllers e.g. https://10.0.0.2
D Click on system settings on the dashboard and as you run through the wizard you will be prompted to set the IP address information.
Update Firmware
Open a web browser and enter the new ip address to connect https://newaddress
When you first logon to the home screen it will prompt you to check if the firmware needs to be upgraded.
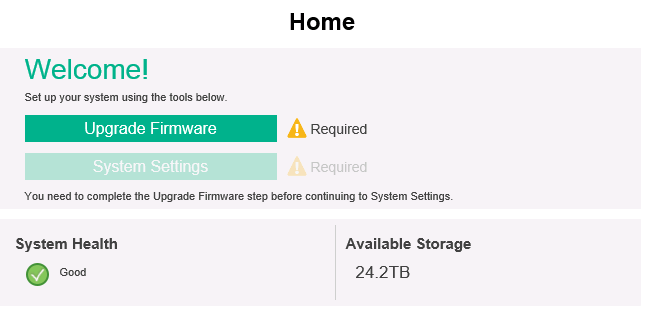
Click on the Upgrade Firmware button and see which version of the firmware you are on. You can check the latest version https://h41111.www4.hpe.com/storage/msafirmware.html. Download and apply the firmware update if necessary or just close the dialog box if the system is already up to date.

Basic System Settings
Click System Settings on the dashboard and this will run you through an initial configuration wizard to get the basics setup.
- Date and time – Set the time manually or specify NTP server
- Manage users – This gives you a chance to reset the default manage password and create any additional accounts
- Install licence – Install additional licences
- Network – This will be the IP addressees you set earlier so there should be no need for any action here
- Services – Here you can set how the device can be managed ed via SSH or web
Once you have your basic system setup you can start to work through the steps to get the storage presented to hosts.
Hosts
You can see connected hosts by clicking hosts in the main left toolbar. Assuming you have already connected your hosts and completed any necessary zoning you will see a list of connected hosts. Select each in turn and choose modify from the action menu to choose a friendly name.
Creating a Disk Pool
Your first step in provisioning storage is to create a Pool, a pool is like a RAID group in which you define RAID type and disks to add.
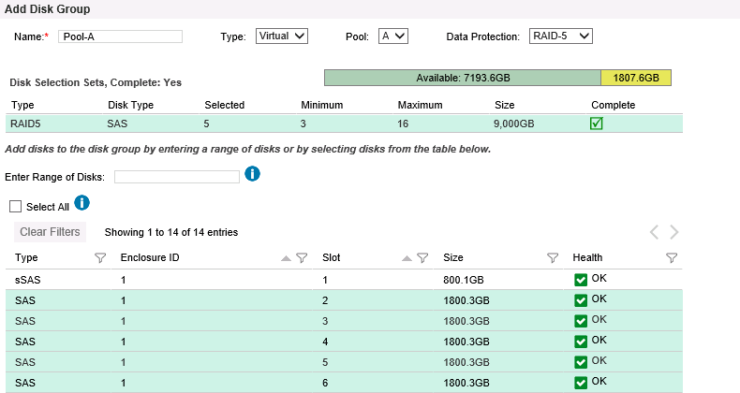
- Select Pools from the left hand menu
- Action menu, add disk group
- Name the pool
- Select which controller you wish to own the pool. Try to balance the pools across the controllers, so there is an even number of pools on each controller
- Choose your data protection level aka RAID level
- Select the disks you wish to add into the group
- For RAID 5 and 6 you need to ensure that the number of data drives in the RAID group is divisible by two for best performance. RAID 6 is recommended for larger NL disks
- RAID 1. Requires 2 disks.
- RAID 5. Requires 3-16 disks.
- RAID 6. Requires 4-16 disks.
Assigning Spares
You will need some spares to act as a hot standby should a disk fail. Dynamic sparing is enabled by default which means that disks not assigned to a disk group will be counted as Global Spares which means that they can act as a spare for any disk group. Spare disks must be at least the same size as the disk they are standing in for.
It is best practice to have one global hot spare per disk group. So make sure you have the correct number and size of disks not in a disk group so they can be global hot spares.
Configuring the Read Cache

An SSD disk can be added into a spinning disk group to act as a read cache to extend the size of the controller cache and improve performance. To add an SSD read cache:
- Select pools from left-hand tool bar
- From the action menu choose add disk group
- From the type drop down select read cache
- Select an SSD and click add
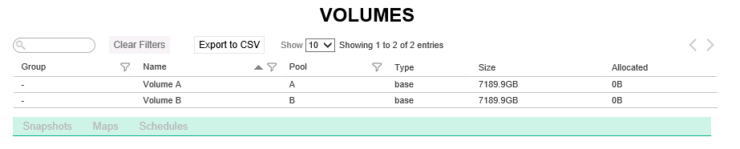
Provisioning Volumes
Next you need to create your volumes which are effectively LUN’s.
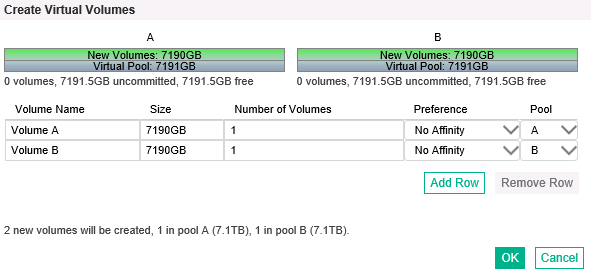
- Select volumes from the lefthand tool bar
- From the action menu choose create volume
- Enter the name and size of the volume
- Remember to balance volumes across controllers
The end result we end up with is as below. We have two volumes balanced across the two storage pools which themselves are balanced across the controllers. By maintaining a one to one relationship between pools and volumes we reduce the complexity of troubleshooting and performance monitoring and this is also a recommended practice for performance as workloads will not be conflicting.
Mapping Volumes to Hosts
Lastly you need to map your volumes to your hosts.
- Select mapping from the left hand menu
- From the action menu choose mapping
- Simply select the initiator you wish and then select the volumes to map to map it to and select map.
Published by