Installing the 3PAR Management Console

The process for downloading and installing the 3PAR Management Console is covered in this post. The 3PAR Management Console was the traditional tool for managing your 3PAR systems. 4.7.3 was the last incarnation of IMC, since it has been superseded by the StoreServ Management Console (SSMC) which gives you a pretty web based management interface.  If you want to get started with the SSMC you can get ready with our SSMC install guide and beginners SSMC posts.

If you are running 3PAR OS 3.3.1 and below or just prefer the traditional management console then read on.

Downloading the 3PAR Management Console

1 You can download the 3PAR Management console, form this direct link which takes you to the 3PAR software depot.  If you just browse the depot its hidden.

Installing the IMC

Its dead easy but here I will walk you though the process with screen shots.

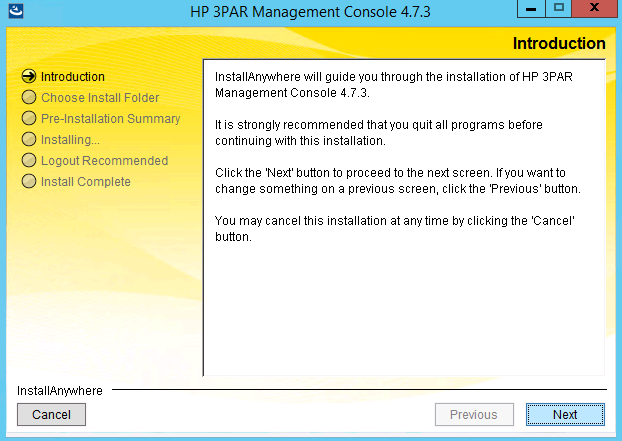
1 Choose to run setup.exe for the v4.7 files you just downloaded. In my case from inside the Windows directory of the ISO

2 Just choose next at the 3PAR management console introduction screen

Introduction screen on 3PAR management console install

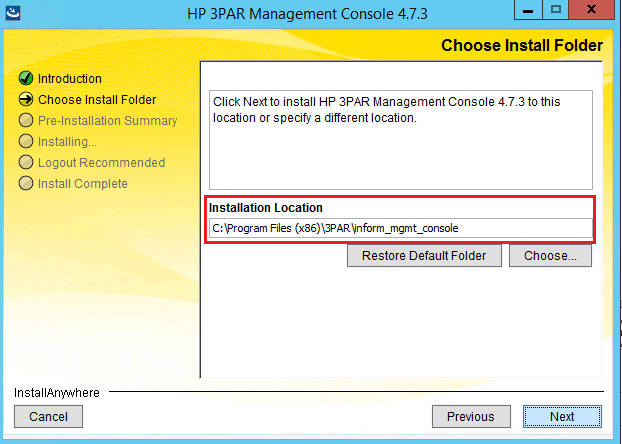
2 Choose the install location, leave it default unless you have specific reason to move it and then click next

Choosing file location for installation

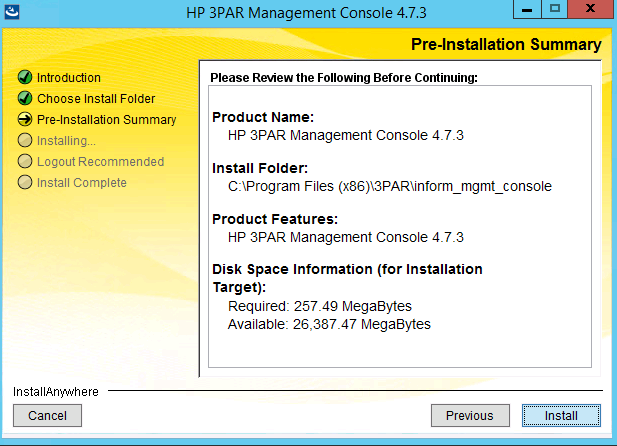
3 A summary of the install appears, check your selections and then click install

Summary of selections made in wizard

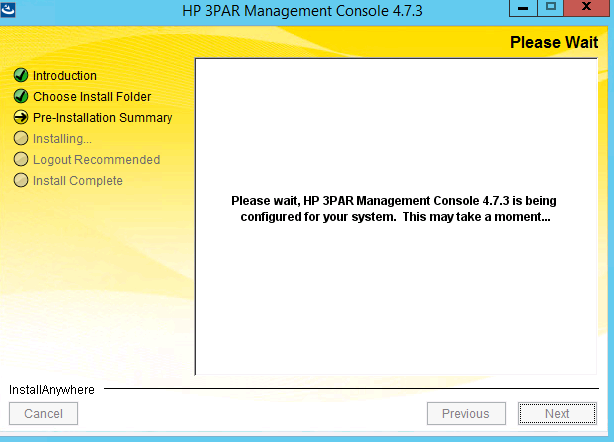
4 A couple of information screens appear during the install, no need for any input.  Just wait for the install to complete.

Screen displaying progress of install

5 That’s it just click done, and you have the latest version of IMC installed!

Screen confirming 3PAR Management console 4.7 has been installed

Don’t forget to install your other 3PAR management tools the CLI and SSMC

You can learn more about the IMC in the HPE 3PAR Management Console User Guide


3Par OS Upgrade 3.1.3 – Part 2 Upgrade Day

Upgrade day was here I packed my lucky rabbit foot and headed into the office. Please note the screen shots below were taken during the last upgraded I posted about as I forgot to take any this time, the process was almost identical but obviously the version numbers you are going to see will differ from those in the screenshots. About an hour before the upgrade was due to begin I completed the following pre-upgrade steps and checks.

Pre-upgrade

  • Check CPU and port usage is below 50%. statcpu -iter 1, statport -iter 1
  • Suspend tasks. setsched -suspend_all, check tasks are suspended as expected showsched
  • Check for any DO activity. showtask –active, for any tasks that are active canceltask taskID
  • Stop system reporter by visiting the machine its installed on and stopping the Windows service

  • Check for any connected users who may be making changes to the system showuserconn
  • Check the connectivity of hosts before the upgrade. showhost –pathsum, I took a screenshot of this so I could verify connectivity was as before after the reboot of the first node
  • Verify health is OK to do upgradecheckhealth –svc
  • Check the system is ready for upgrade checkupgrade
  • Plus I suspended all backups so the system was as quiet as possible

Timings

Next it was time to hand over to HP. The high level steps and expected timing was as follows:

Updating New codes on the service Processor – 60 Minutes (non-intrusive, can be performed in advance)

Performing the pre-upgrade checks – 30 Minutes (non-intrusive)

Node Upgrade to the new InForm OS – (15 Minutes per node) + 5 pause time =  40  minutes

Performing Post Upgrade Check and patch installations – 30 Minutes (non-intrusive)

Drive cage and Drive Firmware update – 110 Minutes for 7 cages (will be run as a background task & monitored till completion (non-intrusive)

Updating the Service Processor

The HP engineer first downloaded the update for the Service Processor and Inform OS. Next he disabled alerting in the Service Processor and chose to run the Service Processor update ISO. This stage was completed quite quickly and next he moved onto loading the Inform OS to the Service Processor.

Health Checks

Next was the health checks, again we moved quite quickly through this as I had ran most of them myself before the upgrade. In addition to the checks I ran above he also ran the following commands:

showsys –d, showversion –a –b, showpd –failed –degraded, shownet, showalert, shownode, showcage, showbattery, showport –d

Node Upgrade

The Inform OS update had already been loaded to the Service Processor so the next stage was to stage the new code to the controllers. This was achieved by connecting through SSH to the Service Processor and running a bunch of commands to transfer the files. When the upgrade was kicked off I took a handful of screenshots to show roughly what happens.

Frist the upgrade goes through some pre-upgrade checks

Next the staged software appears to be transferred so it is ready to be actively installed

Next node 0 reboots and picks up the new code

There is then a pause between reboots of the nodes during which HP will allow you to check all looks OK. I checked our alerting software, checked all VM’s were still online and ran a showhost –pathsum to check that all paths and accessibility to nodes was OK. Before the last node reboots HP are able to roll the upgrade back in an online manner, once the last node has been upgraded this must be done offline. All looked good in my case so I let the upgrade continue.

Post upgrade checks

Once both nodes were upgraded the HP engineer then ran the following checks shownode, showversion a – b, and then re-enabled scheduled tasks with setsched -resume_all

Cage and Drive Firmware Upgrade

Next it was time to upgrade the firmware of the cages, this was kicked off with the command starttask upgradecage –a. To check the task was running the following commands were run: showtask –active and then we were able to drill down for more details by running showtask –d taskID. Progress was also monitored by running showcage. In the screenshot below you can see that about half the cages were done at this stage with half on 320f and half on 320c (you can see this in the RevA and RevB column).

Once the cage firmware upgrade is completed it’s time to upgrade the firmware of the disks. Showpd –failed –degraded, those disks that require a firmware upgrade will show as degraded. To kick off the disk firmware upgrade run admithw. Progress can again be monitored though showtask and re-running Showpd –failed –degraded. To do all the disks and cages in our 7 cage system took about 1.5 hours.

Admithw appears to recreate the default CPG’s. I don’t like these to be there in case someone accidentally adds a VV to them so I did a showcpg to double check they contained no VV’s and then removed them with removecpg

Final Tasks

I then ended the remote session with the HP engineer and next set about updating all the attached Windows 2008 and 2012 Servers to host persona 15. Setting the host persona to 15 presents LUN’s in the manner which Windows expects and the good news is this means the application of KB2849097 is no longer part of the upgrade process. To set each Windows host to persona 15 I ran the following command:

sethost –persona 15 servername

Once this was done I set about the following final tasks:

  • Kicked backups off again
  • Restarted system reporter service on system reporter service
  • Checked for new alerts showalert –n
  • Check the hosts path showhost –pathsum
  • Ran a checkhealth
  • Checked all VM’s were online without issues
  • Checked our monitoring software
  • Updated software – CLI and management console. This was again downloaded from HP’s FTP site and was a simple case of just clicking next through the install wizard.


That’s was it successfully onto 3.1.3, interestingly once you are on 3.1.3 you can perform your own upgrades without HP having to install the software for you. This new process is explained in this excellent post by Bart Heungens.

Further Reading:

HP 3PAR OS Upgrade Pre-planning Guide

HP 3Par 3.1.3 Release Notes

HP 3PAR Windows Server 2012 and Windows Server 2008 Implementation Guide


If you missed the first part of the series catch it here.


3ParDude

Disk load and Tunesys

One of our 3Par system was becoming full, in terms of capacity so it was time to add some new disks. The system had some empty slots in the already existing cages, so the plan was to fill all the empty slots with new disks.


The 7400 system is configured with 2 large form factor shelves and 5 small form factor. The large form factor shelves currently contain 3TB SATA 7K disks. The additional NL drives would be of exactly the same size and speed, HP however confirmed we would be able to add a higher capacity 850GB 10K SAS into our existing FC CPG.


The procedure and best practice for adding new drives is covered in The HP 3PAR StoreServ 7000 Storage and Installation Guide. The physical installation of the drives is covered on P26 of the guide, it gave no mention of how many disks to load at a time so I took a cautious approach of putting one in and took my time unwrapping the next one, not a bad way to spend a Friday afternoon!


The HP 3PAR StoreServ 7000 Storage and Installation Guide contains the best practice on how the drives should be arranged. The key things where

  • The drives should be balanced across cages
  • For a node or M6710 Drive Enclosure (SFF), drives must be added in identical pairs starting from slot 0 on the left and filling to the right, leaving no empty slots between drives
  • For the LFF cages (M6720) NL and SSD’s must not be mixed in the same columns. Drives must be installed in identical pairs starting at the bottom left and no spaces must be left


Once all the disk are in the system if you have exceeded the number of disks you are already licenced for you will need to install additional disk licences with a setlicence command. You will then need to issue an admitpd to get the system to recognise the new disks. Once you have ran admitpd you should see your disks as available for use. As my CPG’s were set to use all available FC and NL disks they were added as a available to the CPG with no further action required.


The next step is to rebalance the system, as the new disks will be almost empty whilst your pre-existing disks hold all your data. To rectify this you need to run tunesys which is essentially a system rebalancing tool. Tunesys runs through 3 separate stages in order to rebalance the system these are:


Phase 1 – Analyzes and rebalances virtual volume capacity imbalance between nodes (inter-node tuning).

Phase 2 – Analyzes and rebalances space usage between disks associated with each node (intra-node tuning).

Phase 3 – LD re-layout tunes. LDs where the current characteristics differ from the associated


So in simple terms, phase 1 is useful when adding additional nodes, phase 3 is useful when amending CPG characteristics and of most interest in this case was phase 2 to balance the chunklets across the new disks added to the system. To see what the current space distribution was I ran the following command to see the space layout for NL and FC disks respectively

3PARSAN1 cli% showpd -space -p -devtype NL

3PARSAN1 cli% showpd -space -p -devtype FC

In my case it was imbalanced so I next ran tunesys with the dry run switch to see exactly what tuning would be performed without actually going ahead and doing it.

3PARSAN1 cli% tunesys –dr

Are you sure you want to tune this storage system?

select y=yes n=no: y

*

*********************************************************

** Storage system tuning started

*********************************************************

*

tunesys -dr

Parameter summary:

——————

Task ID             = none

Nodepct             = 3

Chunkpct             = 10

Diskpct             = 10

Maxtasks             = 2

Dry run flag         = 1

Waittask mode       = 0

Clean timeout       = 120

System chunklet size = 1024

cpgs                 = ALL

*

*********************************************************

* PD Analysis

*********************************************************

*

——FC——-

—————–Description—————— 15K 10K 10K+15K   NL SSD All

Number of Available PDs with free chunklets   0 144     144   48   0 192

Number of Available PDs with no free chunklets   0   0       0   0   0   0

—————————————————————————-

Total Number of Available PDs   0 144     144   48   0 192

—————————————————————————-

Maximum number free chunklets in a PD   – 682       – 2666   – 2666

Minimum number free chunklets in a PD   – 20       – 363   –   20

*

*********************************************************

* PD Node Balance Summary – Device type usage across nodes

*********************************************************

*

*

*

*********************************************************

* Inter-node device type average summary

*********************************************************

*

Device type: FC10 Average Usage per node “72.00”% threshold “75.00”%

Device type: NL7 Average Usage per node “48.00”% threshold “51.00”%

——————–Node Disk availability & percentage use——————–

—-0—- —-1—- —-2—- —-3—- —-4—- —-5—- —-6—- —-7—-

Devtype Dsks Usd% Dsks Usd% Dsks Usd% Dsks Usd% Dsks Usd% Dsks Usd% Dsks Usd% Dsks Usd%

—————————————————————————————

FC10   72 74%   72 71%   0 0.0%   0 0.0%   0 0.0%   0 0.0%   0 0.0%   0 0.0%

NL7   24 49%   24 47%   0 0.0%   0 0.0%   0 0.0%   0 0.0%   0 0.0%   0 0.0%

—————————————————————————————

*

*********************************************************

* Phase 1 skipped

* No inter-node tunes need to be run at this time.

*********************************************************

*

*

*********************************************************

* Phase 2: Performing Intra-node balance checks:

*********************************************************

*

*

*********************************************************

* Node 0 has 19 underallocated PDs and will be tuned

*********************************************************

*

*

*********************************************************

* Node 1 has 17 underallocated PDs and will be tuned

*********************************************************

*

*

*********************************************************

* Dry run – The following ND tunes would be

* performed:

*********************************************************

*

tunenodech -f -nocheck -dr -maxchunk 2 -chunkpct 10 -node 0

tunenodech -f -nocheck -dr -maxchunk 2 -chunkpct 10 -node 1

*

*********************************************************

* Phase 3 skipped – No LD re-layout tunes needed.

*********************************************************

*

*

*********************************************************

* Dry Run completed

*********************************************************

*

Number of tunes suggested: 2

I was happy with the output of the dry run so went ahead and ran the command:

3PARSAN1 cli% tunesys


You can monitor progress at a high level with showtask

You can drill into the tunesys task in more detail as below:


3PARSAN1 cli% showtask -d taskID


You will also see background tasks listed for each phase, for example

9284 background_command tunenodech       active   1/2 501/509 2


You can then again drill deeper into this, for example: 3PARSAN1 cli% showtask -d 9284


Don’t expect it to be quick, my case it took over a week to complete.  So go and make yourself a cup of tea, a big one!